Facebook is the most popular social network with more than 2 billion active users each month. It is no longer just a platform to make online friends, but a multidimensional platform that connects, advertises, games and much more.
Facebook is available on computers, tablets and smartphones. Now, it is changing the way we find customers. sell a productIf you want to know more about a specific topic, please click on the link. get hired In today’s world, there are many ways to get involved.
Facebook is a huge success because it allows you to do things that weren’t possible before. You can, for example, connect with old acquaintances, interact with others, and respond to their posts. content.
Social media opens up new opportunities to everyone. There are still a large number of internet users who don’t take advantage of this powerful tool to attract attention.
Facebook advertising is an effective solution, but the majority of people don’t triple down on this idea.
Facebook has a number of innovative ideas. Some of them have been extremely successful, such as Facebook ads. videoGroups, pages and chatbots Facebook has created some amazing products.
Facebook has grown over the past decade and improved not only its community-building capabilities, but also its business features.
Facebook can be used for gaming and posting. photos Facebook is a great tool for many people. But it’s also true that Facebook helped millions of businesses grow.
You can also find out more about the people by clicking here. write reviews Promote the restaurants on their websites, sell products at the marketplaces and create community in the groups.
If you are a business, innovation does not stop there. Facebook Pixel is a prime example of this innovative approach.
Facebook uses this revolutionary feature every day.
You’re about discover something that will change the way you do business and market. boost your conversions. Let’s dig deep to find out exactly what the Facebook Pixel is.
1 What is Facebook Pixel?
Facebook Pixel is code provided by Facebook to advertisers. It can be inserted in their website code and used for Facebook ads that target visitors.
The advertiser will install this code on the website in order to reach the Facebook visitors.
The way this code works, is interesting. If a user lands on a page or website that has Pixel installed on them, Facebook will be able to identify that same user on Facebook.
Facebook advertisers can target the same Facebook visitors through Facebook ads by embedding the Facebook Pixel code in their website codes.
You visited a website, browsed the products and then saw the same ads on Facebook. Facebook Pixel makes this happen.
These online stores are doing exactly what we’re going teach you in this tutorial. This is not a new feature; many other platforms offer similar features. Retargeting is what’s used in online advertising.
2 How to install the Facebook Pixel on WordPress?
You don’t need to be an expert in order to insert or remove a syringe. editing the code. It is important to understand the process, before you create or install the Pixel code.
If you’re a WordPress userIt might become a lot easier, even if WordPress is not your forte. Attention: Pay attention to all the steps involved in installing the Facebook Pixel.
Installing the Facebook Pixel on WordPress is easy with this step-by-step tutorial:
2.1 Create the Facebook Pixel Code
Create your Pixel code first on Facebook. To do so, go to “Manage Ads” option on Facebook.
Create your Pixel code by clicking on the “Pixels and Conversions”, option in the Facebook Ads section.
![]()
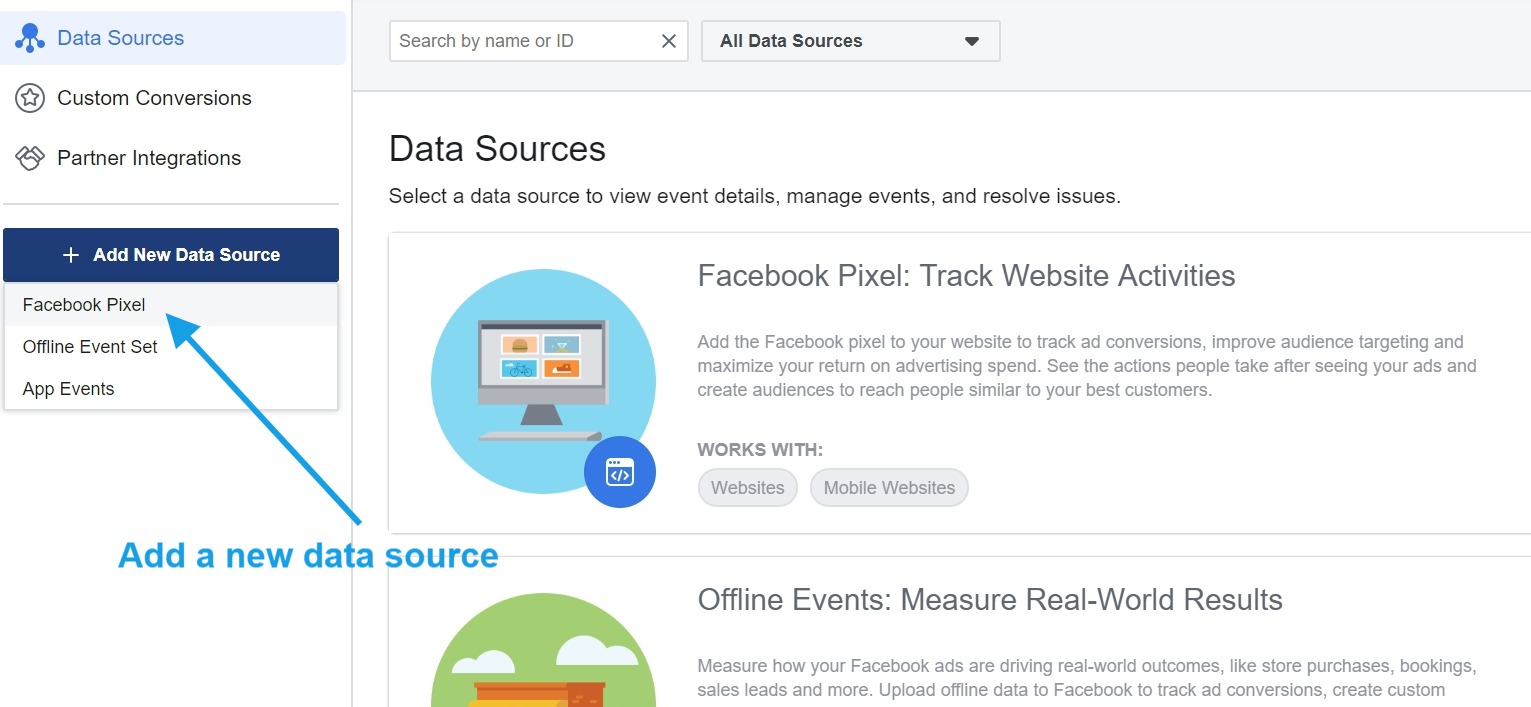
Next, you will need to start the creation of pixels. On the left-hand side of the screen, click on “Add New Data Source”. Select the Facebook Pixel from the list of options once it opens.
You’ll be prompted to enter both the pixel name and the URL. URL of the website Where you want to add the pixels code.
You can now proceed by naming the pixel, and mentioning the website URL. After you’ve written these two things, click the “create” button to continue.
![]()
You’ll be prompted to confirm your action after you enter the URL of your website and the pixel name.
![]()
You’ve now successfully created your Facebook Pixel. Now that you’ve completed half of the work, it’s time to add the Pixel code to your website. You can do it in two ways. We will show you both.
2.2 Content Management System
Installing the Facebook pixel means integrating Facebook ads into your website. You must add the Pixel code to your website code.
Facebook will ask how you want to add Pixel code on your website once you have generated the Pixel Code.
![]()
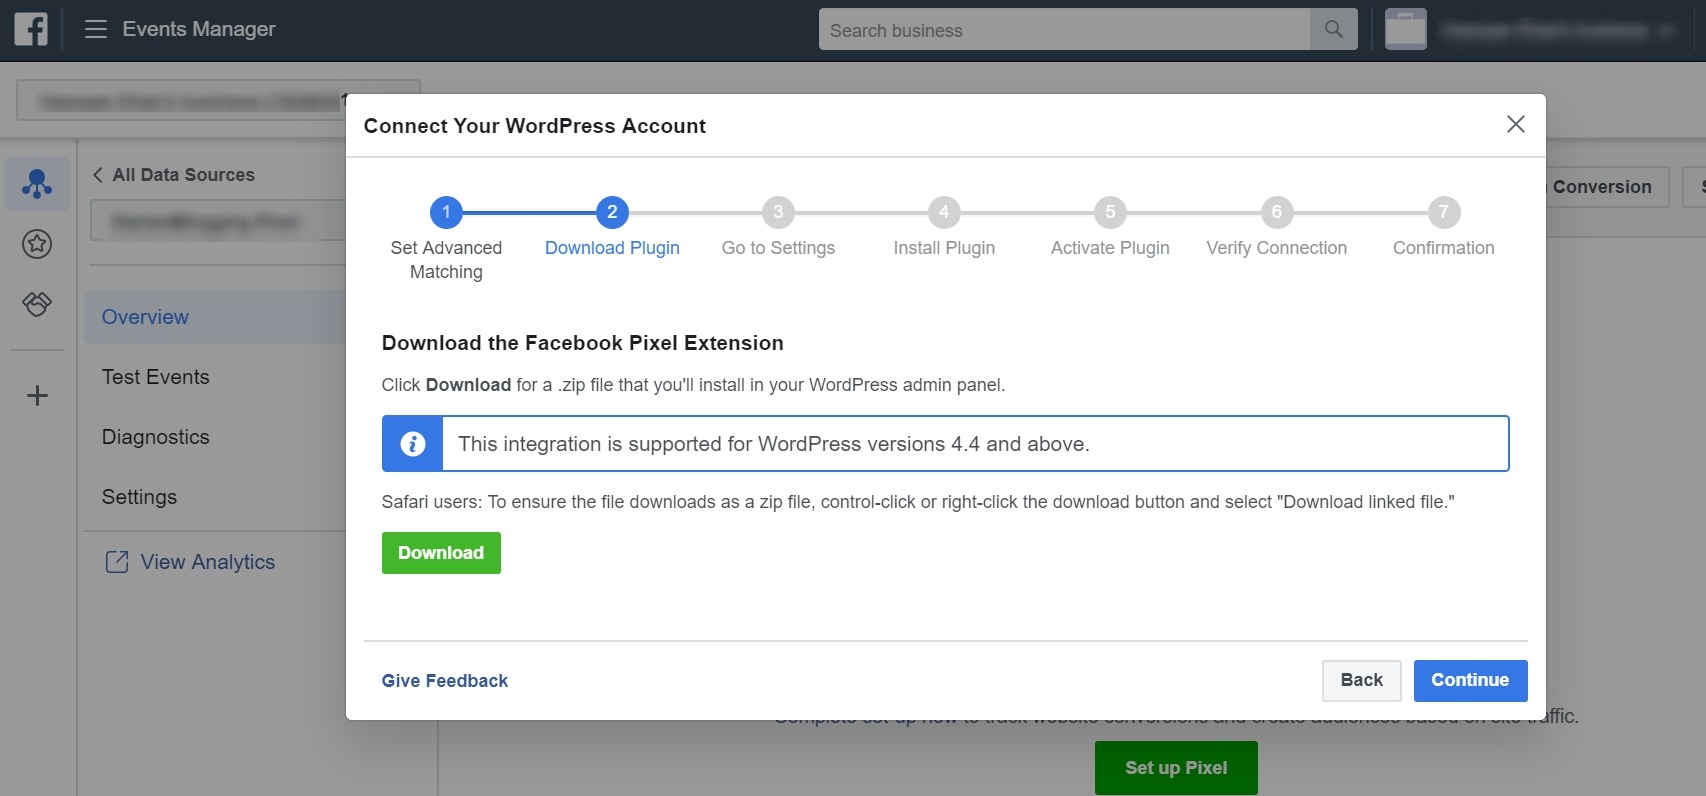
Pick a few. WordPress This article has a very specific purpose. Install Pixel for your WordPress website. Select “WordPress”, then click the “Set up Partner” button next to the WordPress option.
![]()
Follow the steps below to install the Pixel plug-in in WordPress and connect your Facebook account with your WordPress site.
2.3 Installing the Facebook Pixel plugin
Now is the time download the Facebook Pixel plugin Install Facebook Connect on your WordPress site.
Facebook has made it easy for you to download this official Facebook plugin.
Download the plugin, and then activate it. Install the plugin on your WordPress website by going to the plugins area.
Installing plugins is as simple as clicking on “Add New”. Please refer to the screenshot for more information.
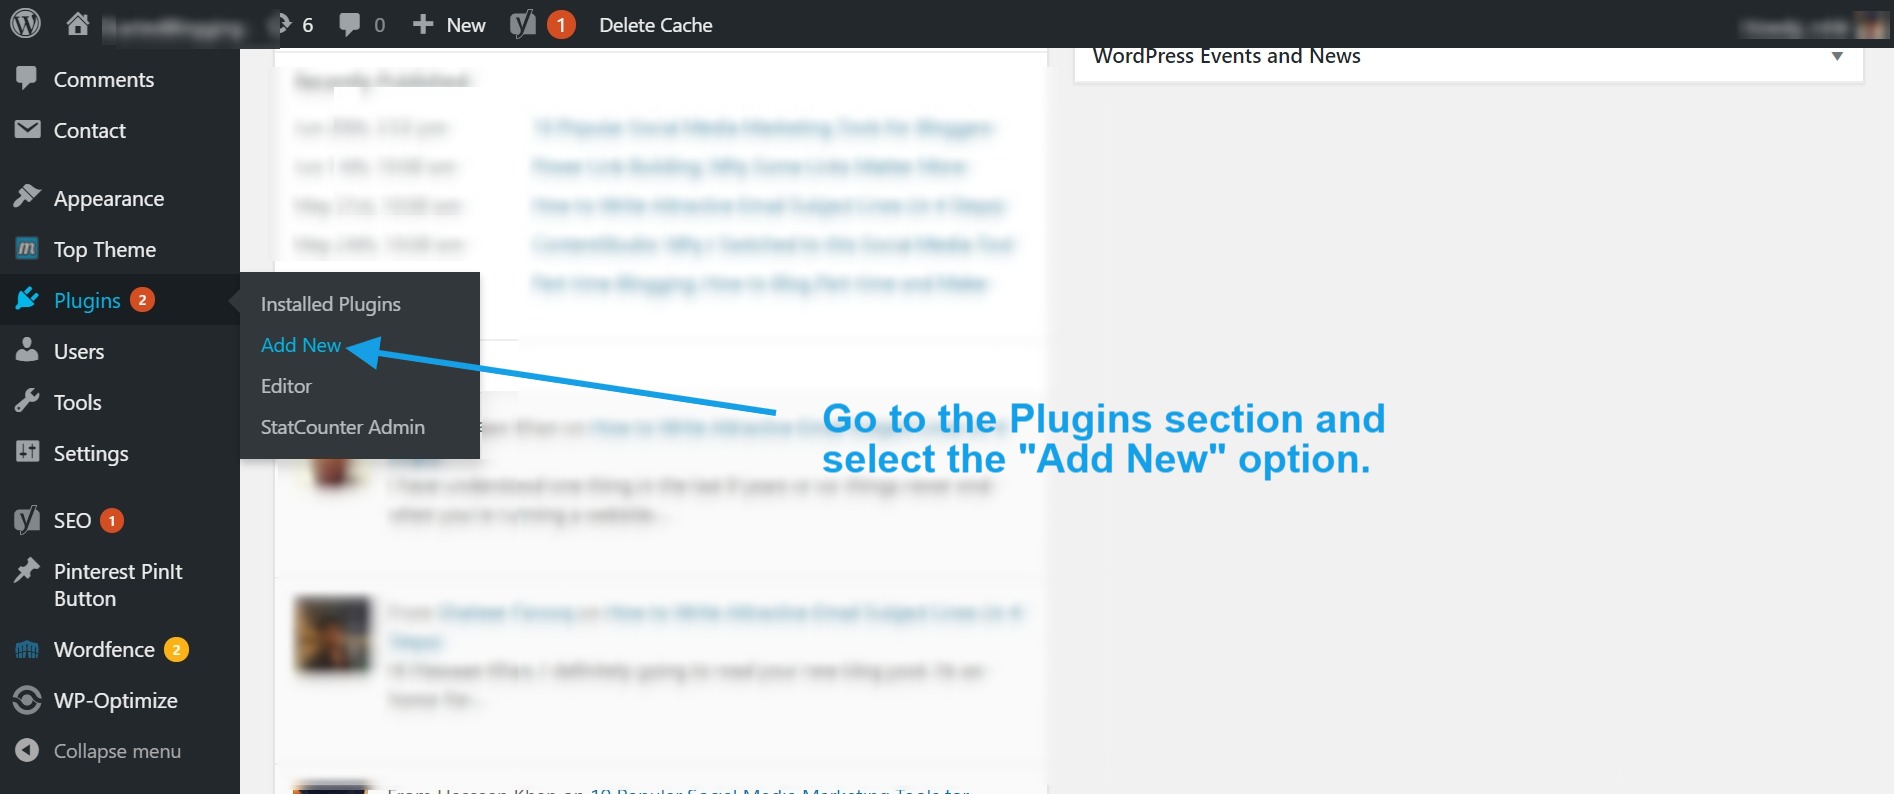
Install the Facebook Pixel plugin on your computer. Do not hesitate to install the Facebook Pixel plugin in case you haven’t done so already. WordPress plugin before.
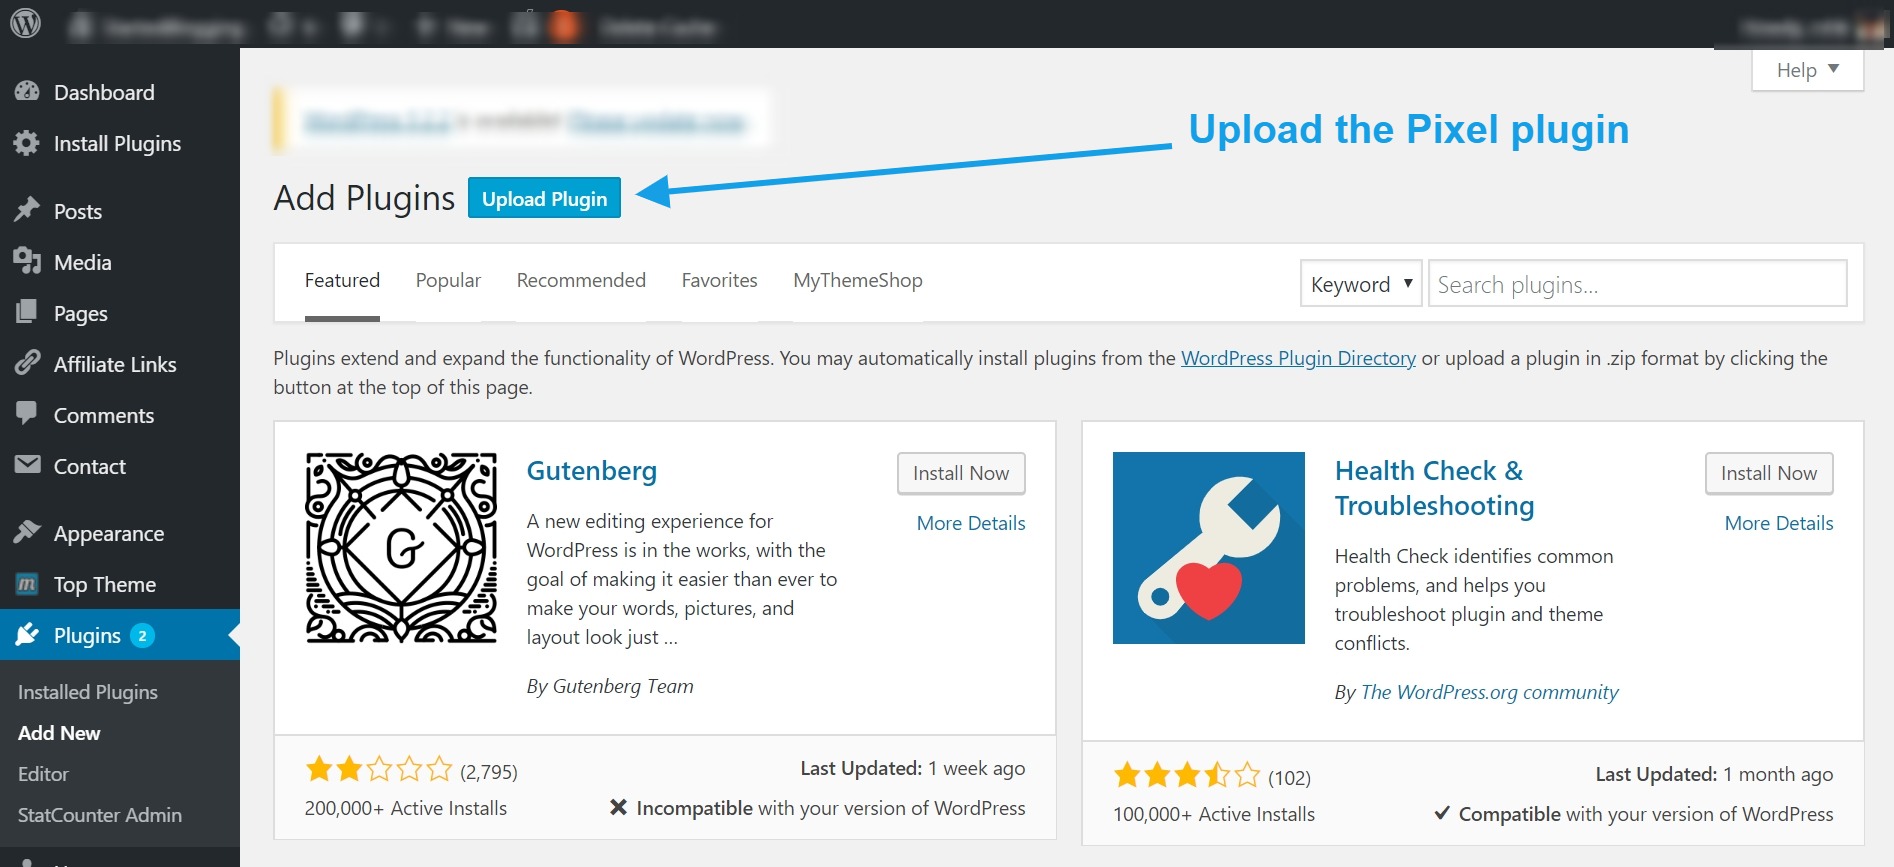
Then click the “Upload Plugin button” to navigate to where you downloaded it on your computer. After you’ve finished uploading your plugin, this screen would appear.
![]()
To activate the plugin, click on “Activate Plugin”. Go to Facebook, and follow the instructions for setting up your account. It’s important to verify that the code is correct.
![]()
The “Setup completed” screen should then appear.
![]()
Pixel takes some time to record the activities. Don’t be tempted to create a Facebook custom audience or analyze the performance of Facebook pixel. It would be premature to begin capitalizing on the Pixel.
There is a plugin alternative called PixelYourSite This can help you manage Facebook Pixel. Google Analytics No coding required. You can add the Pinterest tag on your site with this plugin.
After installing the plugin, you will need to connect it with your Facebook Ad account using the PixelID provided by Facebook. Look for the Pixel ID in your Facebook account’s Data Sources.
![]()
Then, enter the Pixel ID under the General tab of your settings. Ensure that the Facebook event settings are enabled in the plugin.
![]()
3 Installing Facebook Pixel manually is an alternative method.
Installing the Facebook Pixel via the code is an alternative to adding a WordPress Plugin or another extension.
If you want to manually insert the code, you will need to have Admin level access to your WordPress dashboard.
When creating the Facebook pixel, select the manual option. This is the screenshot of the window that asks you to choose whether to use a WordPress Plugin or go the manual route.
You’ll click on “Set up Manually” to add the code manually to your website.
![]()
Clicking on the button will bring up a popup window with code for your WordPress site. It would also guide you as to where to place that code on your site.
![]()
You can now copy and paste the code into the header of your WordPress website. Be sure to insert the Pixel code in betweenandsectionof the code. Go to the WordPress Editor and paste the code.

Locate the header.php and paste the code there. Copy the code between the tags.
![]()
You can now save the file. You have now successfully added Pixel code to your website.
![]()
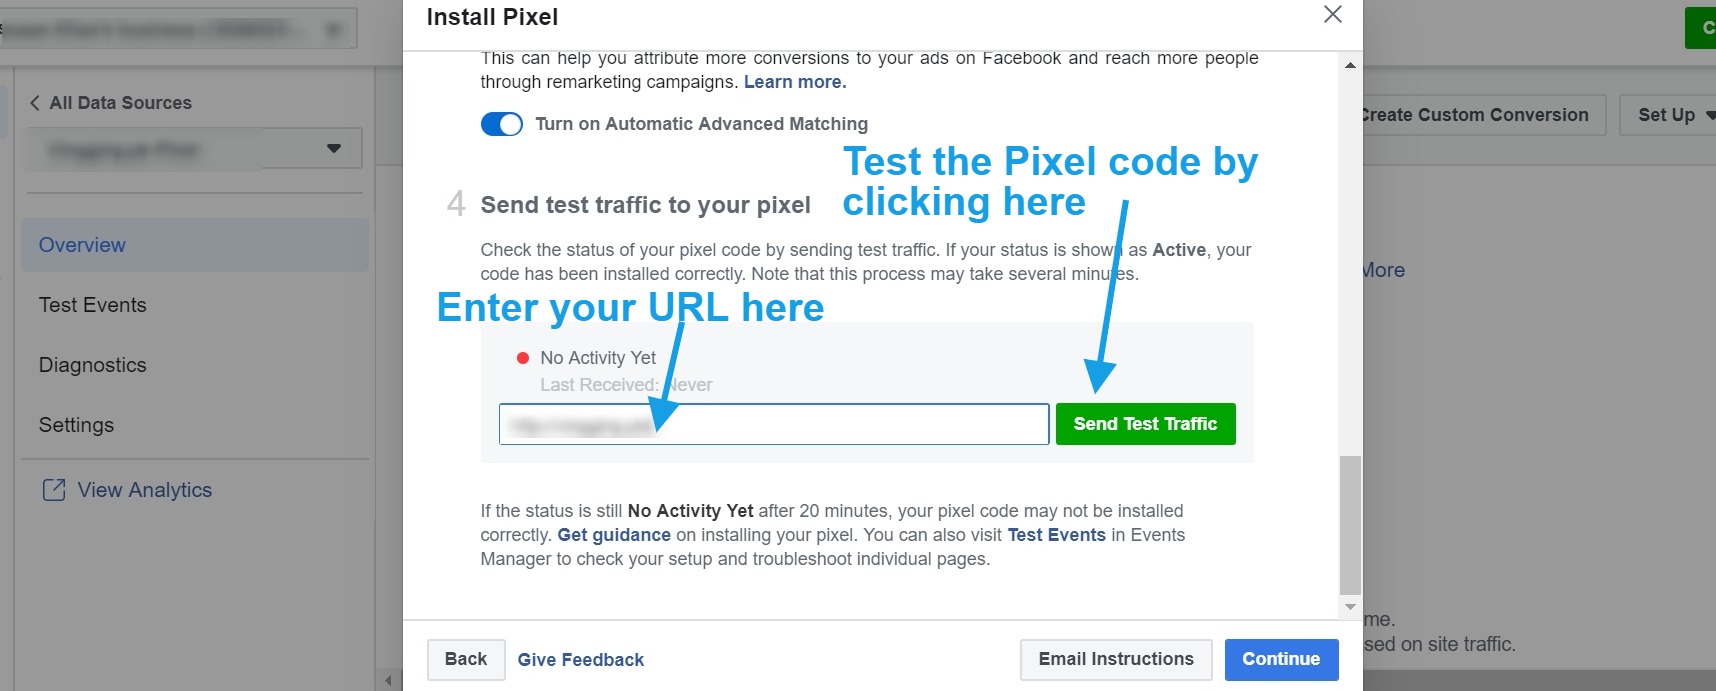
You can now go to your Facebook Ad account and check that the Facebook Pixel is correctly added. You can send test traffic by entering the URL. Your website will open in a browser.
4 What is the purpose of this tutorial?
We showed you how to install the Facebook Pixel on your WordPress website. This is a very simple process, but many beginners have trouble with it.
They may not be familiar with Facebook ads and find it hard to generate the Pixel code. Some don’t know what it is.
We’re fairly certain that you can generate and use the Facebook Pixel code on your website. WordPress blog. If you get stuck, please don’t hesitate writing us in the comments. Your questions will be answered promptly.
This article isn’t just to teach you how to add the Facebook Pixel code to your WordPress blog. It also focuses on discovering new things.
If you are in the software or digital marketing industries, you know that billion dollar companies are created and sold using the best ideas and execution.
Facebook has been among the most innovative internet businesses in recent years. Facebook is not only dominating the web, but also showing us how to be an entrepreneur in the tech world.
You can learn a lot from Facebook’s success by trying new things with no fear of failing.
Do not hesitate to ask about how to install the Facebook pixel. If you’re unfamiliar with Facebook ads, installing the Pixel could be difficult. In the simplest way we could, we tried to explain Facebook Pixel.
What other information would you like to have about the Facebook Pixel?