
Scaling WordPress can be difficult – especially if you aren’t willing to pay hundreds, if not thousands of dollars on hosting every month.
Have you considered Google Cloud Platform, Linode, or Digital Ocean to host your website? Well, we definitely have – and that’s why in this post, we’ll be taking a look at RunCloud.
Simply put, RunCloud It is a cloud-based server management panel.
But before we dive in, let’s take a look at what cloud hosting actually is and what the benefits of it are…
1 What is WordPress Cloud Host?
Typical server configurations limit you to the physical limitations of the server where your website is hosted. Cloud hosting is based on a server and infrastructure configuration that makes it possible to utilize the computing power available from many different servers. This results in a hosting service that is highly scalable and reliable.
The amount of resources needed to host your website The data is distributed over a number of remote servers that are used as needed. The cloud is the term used for a network consisting of many servers that host your website.
2 Why WordPress Cloud Hosting?
Speed, scalability You can also find out more about the following: Cost efficiency.
All of us want our websites to load quickly and we all know we can host them with premium managed WordPress hosting services like Kinsta.
We highly recommend Kinsta’s WordPress hosting because it is really fast, we know that it isn’t the ideal choice for everyone because they are relatively expensive…
Scaling WordPress high-traffic Websites aren’t simpleRunCloud can support hundreds of devices with a single installation. Millions of visitors per monthTens of thousands concurrently logged in users and still load extremely fast When you do so, it is important to be mindful of the following:
RunCloud makes it easy to get your infrastructure running. The hard part is creating a site with enough traffic to crash your server.
3 How easy is hosting WordPress on the Google Cloud Platform?
In the past, you would have had to hire someone to manage your servers for you. This could have cost you thousands. If you don’t have the time or energy to learn everything about servers, you shouldn’t attempt to do server provisioning and administration yourself.
RunCloud, however, allows anyone to get their server up and working in no-time. As someone who has personally used RunCloud, I can attest to this – it is extremely easy-to-use and nice to work with.
1. Create your RunCloud account
Create your RunCloud account once you are ready to host your website with popular cloud providers such as Amazon Web Services (AWS), Google Cloud Platform and Digital Ocean.
You can also click here to learn more about click here Start your free trial now.
After creating your account and logging in which is extremely easy to do because you can even use your Google account to do so – you will be taken to your RunCloud dashboard.
No servers are connected. This is the screen you will see.

2. Connect to your first server
The first time you connect to RunCloud it might seem daunting, but by following this tutorial step-bystep you’ll have your lightning-fast WordPress website at the end.
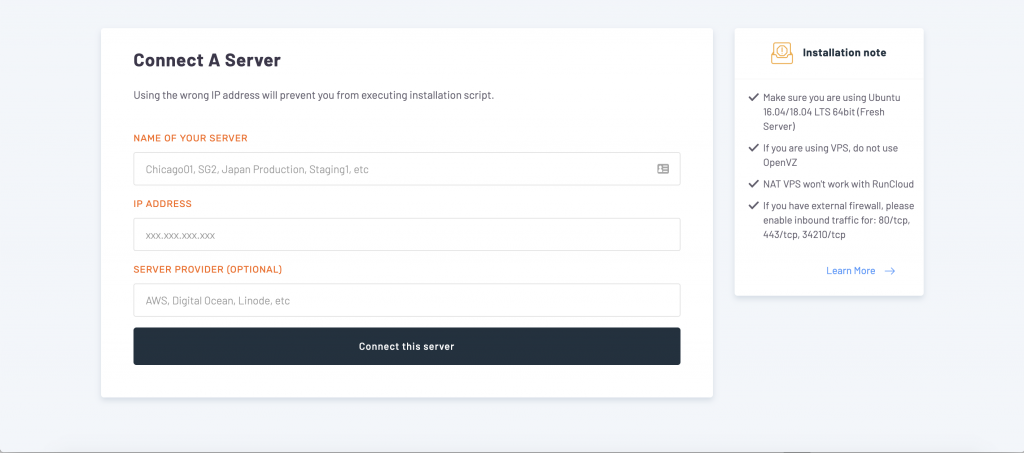
You’ll be asked to enter basic information such as:
- Your server’s name
- Your server IP address
- Your server provider is optional
It is important to note that the word “you” means “you”. Name You can name your server anything you like to make it easy to identify once you have multiple servers.
You can also find out more about us on our website. Server’s IP Address needs to be exactly the same as the value that you’ll find when you log into either your server provider’s dashboard – this could be either Digital Ocean, Linode, AWS, the Google Cloud Platform or any other compatible cloud provider for that matter.
Last but not least, you can choose to optionally enter your Server Provider I think this is quite useful if you use multiple server providers and would like to be able to easily see which server is with which provider. This is useful if you have multiple servers and want to know which one belongs to which provider.
3. Provide your own server
Next, you will need to complete the provisioning of your server.
Click on the button below to enter the information. This server is available to connect This is the page you’ll be taken to. In this post we have called our server RunCloud Test.
The code you are shown will need to be copied and then SSHed into your server.
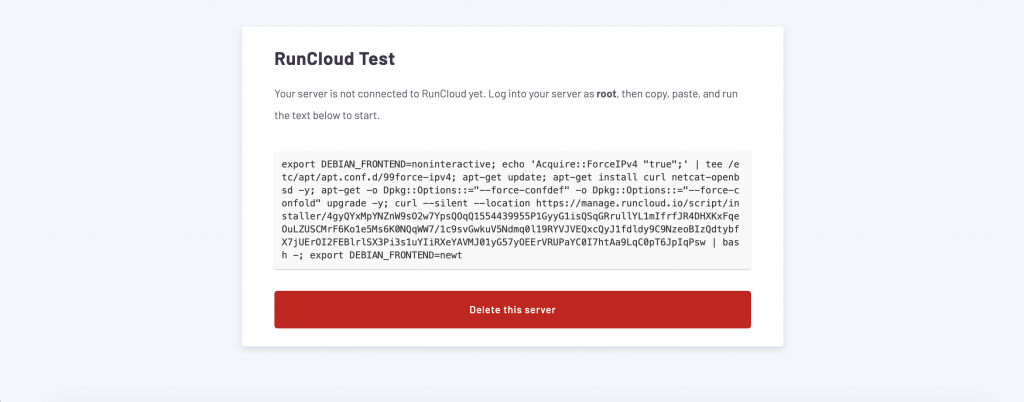
RunCloud then installs the necessary dependencies, as well as other tools like Fail2ban MariaDB and NGINX. After the installation is complete, you will see the newly created user and password as well as the database root.
That’s all! Meet your new server ?
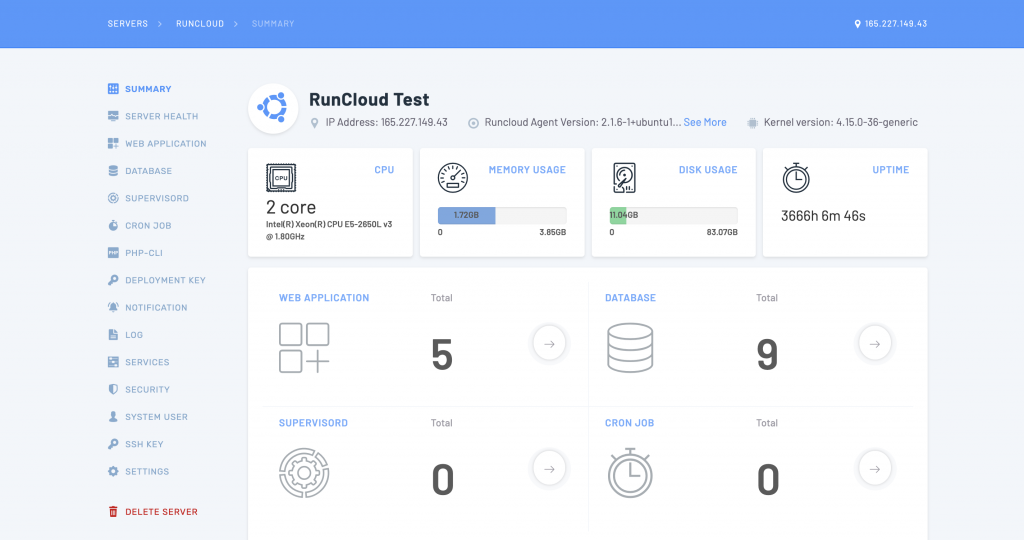
After we have guided you in connecting your server to RunCloud let’s see what you can do.
4 Monitor Server Health
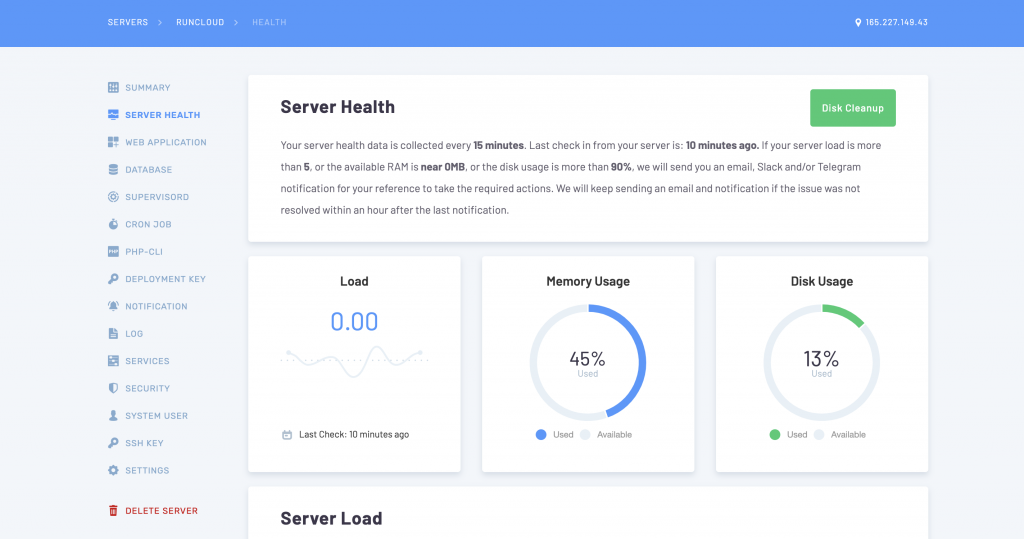
When your server connects to RunCloud, you can easily monitor the load your server experiences along with other important information such as disk and memory usage.
This is an area that you should check regularly, particularly if your site is experiencing rapid growth and a sudden increase in traffic. It might be necessary to increase your server’s memory and disk space if you find that your usage is high. memory exhausted issue.
5 Installing WordPress
Create the Web Application

The start installing WordPressYou need to first create a Web Application, as RunCloud calls it. You’ll then need to go to the Web Application Tab the menu on the left and click Create Web App
You can now enter your Web Application details. You may already have an existing Web Application. domain If you have it, enter it. Otherwise, skip this step.
Scroll down to the bottom and click on it. Add Web Application Click the button at the bottom.
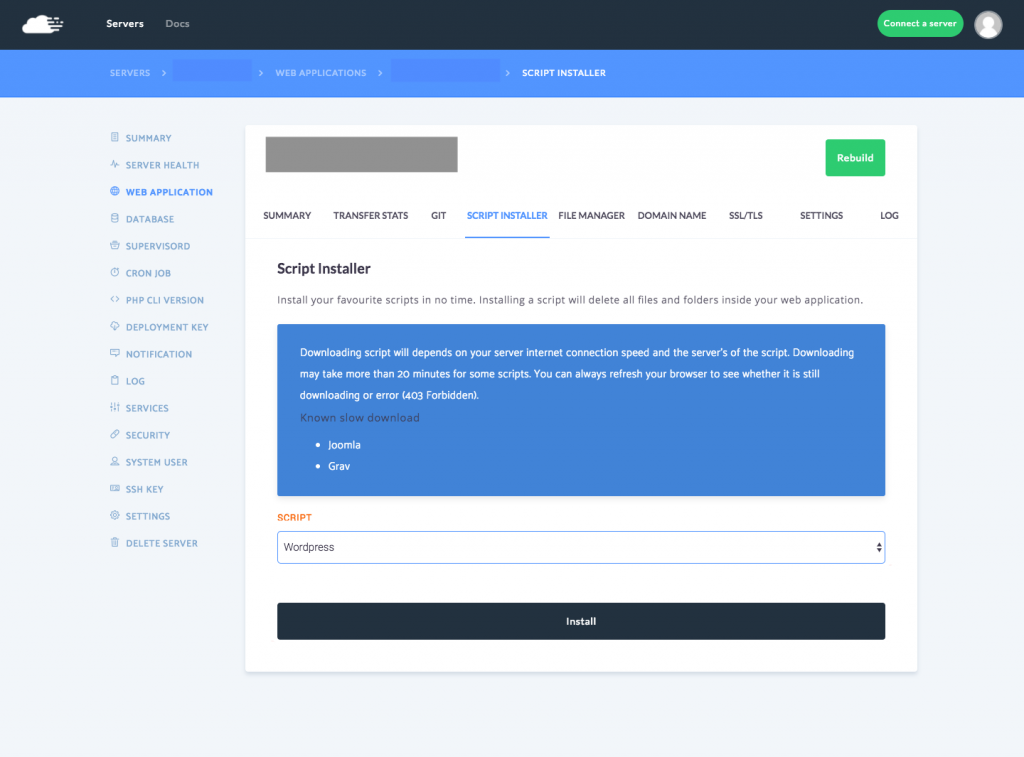
Using Script Installer for WordPress Installation
Now for the easy part. Click on Installer Script Install WordPress.
Creating your database

We’ll now need to create a new database and add a user to it. Thanks to RunCloud this is extremely easy to do – just click on Create Database Click on the button, give it a title and select a collation. Add Database.
Create a user and give it a name. Then generate a password that is strong so you can add the user to your database.
You’ll need to copy the password so that you can paste it and use it during the famous WordPress 5-Minute install…
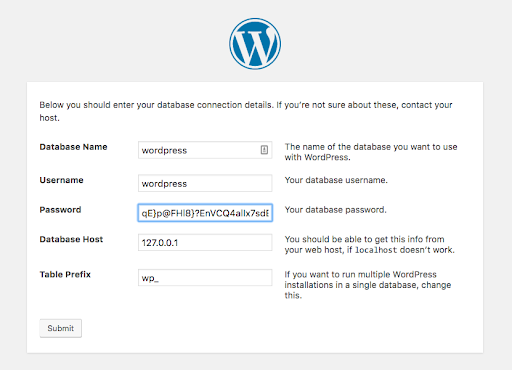
Once you have entered all the necessary information, click Submit The magic will happen!
6 Why not use only shared or managed hosting instead?
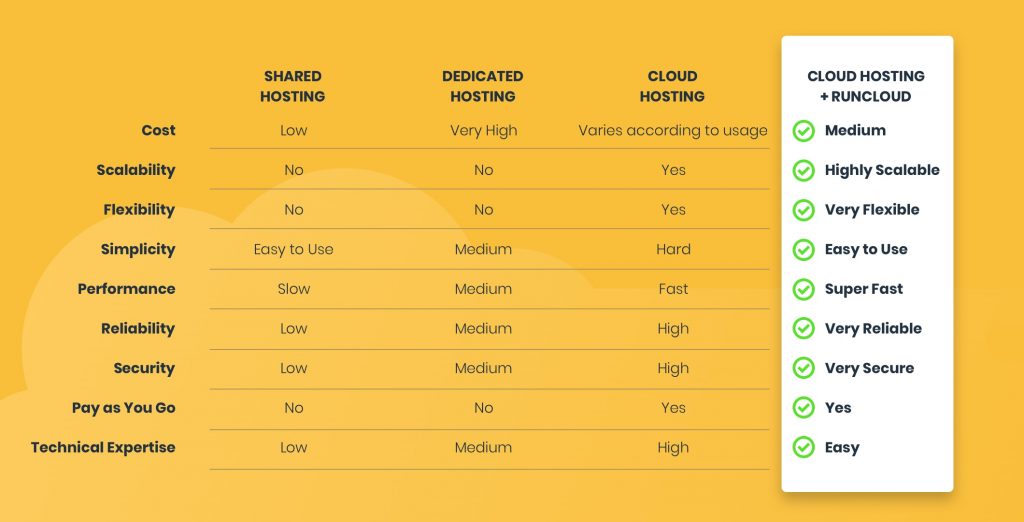
Answer: It is simple. The answer is simple. speed RunCloud should be your first choice. RunCloud will look complicated to someone who’s never used SSH to access their server, but it’s the perfect place to begin if you want to learn and try new things.
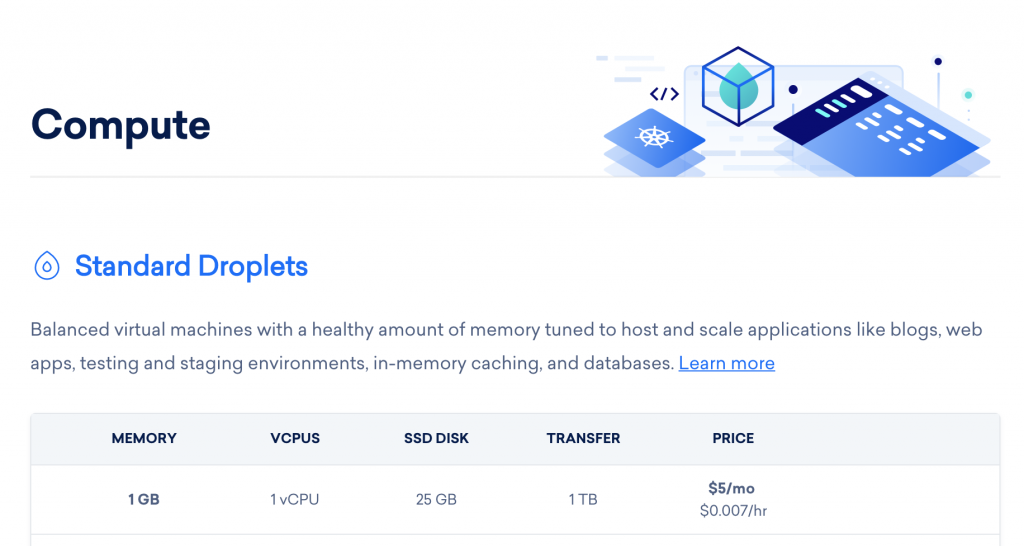
It’s clear that connecting to RunCloud, which offers SSD Disk storage and power for as little as $5 a month, is the best option to enter cloud hosting without having to spend hundreds of thousands of dollars.
So, to wrap things up – we hope you’ve found this post useful and hopefully decided to try RunCloud out for one of your next projects or migrate your existing websites over to RunCloud. If you want to make your website load faster after you’ve completed this step, then we recommend that you read our detailed guide. WordPress speed optimization guide You can learn to do it.
Have a question about RunCloud? Feel free to leave a comment below…