

Should you simply began a weblog on WordPress, the temptation to make it good is robust. You need to strive all of the beautiful WordPress themes, experiment with all of the helpful plugins and take a look at all of the options of WordPress out.
However doing that straight in your web site could be dangerous. Right here’s why. If you end up experimenting, issues have a tendency to interrupt. You wouldn’t need to break your weblog, proper? So how are you imagined to work on your blog?
The reply is to put in WordPress regionally. Replicating the situations of your internet hosting surroundings, you may install WordPress in your Home windows or MAC pc.
Consider it like this. You wouldn’t attempt to use a brand new transfer in a championship sport, proper? You’ll check it out within the playground, good it after which use it in a match.
An area WordPress set up is your playground the place you take a look at adjustments, options, and plugins for an actual website. When you good it, you may then replicate the adjustments to your precise website. Working with WordPress regionally has many different benefits as properly.
- You possibly can experiment with out worries. Even should you break one thing, your actual web site just isn’t affected.
- You possibly can check out totally different themes in your web site with out annoying your guests. Solely you may see the adjustments you make.
- You possibly can work a lot quicker with a neighborhood set up. Should you make any code adjustments, you may view them immediately in your pc.
- It’s cheaper. Since you’re utilizing your pc, you aren’t paying for internet hosting or bandwidth. You possibly can work on a neighborhood set up for so long as you want.
- There’s no draw back. Even should you break something past restore, you may scrap the entire setup and begin once more.
- You too can use the native WordPress for writing. You possibly can create the perfect layout and formatting at your ease and duplicate the article to your essential website.
Let’s take a look at a number of the main factors that we might be overlaying on this detailed put up.
1 How Do Web sites Work
After we entry an internet site, we hardly ever take into consideration how we see the web page we see. Behind the scenes, a number of applied sciences work collectively to point out you the web page that you simply simply visited.
The mixture of those applied sciences is known as a expertise stack or tech stack. A typical tech stack that’s used for web sites is named the LAMP stack. Here’s what it means.
- L: Linux. It’s a widespread working system used on servers
- A: Apache. It’s a widespread net server. An internet server is what you have interaction with if you open any web site
- M: MySQL. It’s a widespread database administration system. MySQL helps retailer and retrieve the precise data that you simply see in your display screen. Even this textual content that you’re studying is saved in a MySQL database
- P: Generally stands for PHP. PHP is a scripting language through which WordPress and plenty of different applications are written in
2 Creating The Similar Setting On Your Pc
To put in WordPress regionally in your Home windows PC or Mac, it’s a must to create the identical expertise stack in your pc. After you have the expertise stack put in, all it’s a must to do is install WordPress.
Don’t let the technical phrases scare you. It’s not as sophisticated because it sounds. Consider it like this. Any normal piece of software program that you simply use on Home windows or Mac pc is advanced underneath the hood. However putting in it and utilizing it isn’t laborious.
A contemporary automobile is made up of 1000’s of parts working collectively. That doesn’t imply driving it round is troublesome. Putting in and utilizing a LAMP stack may be very comparable.
3 Selecting A Software program For The Tech Stack
The excellent news is that you simply don’t should arrange your tech stack individually. There are some bundled software program that you should use to put in the expertise stack in your pc. These software program can be found for the PC and Mac as properly.
We’ll take a look at 3 of the preferred software program to arrange WordPress regionally in your Home windows or Mac Pc.
- WAMP (Troublesome)
- XAMPP (Simpler)
- Native by Flywheel (Best)
4 Putting in WordPress regionally with WAMP
WAMP stands for Windows, Apache, MySQL, and PHP. It’s much like the LAMP stack we mentioned above.
The one distinction is that WAMP is made for Home windows. Since we use Home windows as an alternative of Linux, the stack adjustments from LAMP to WAMP. We hope that is smart.
To put in WAMP, go to their website and obtain a duplicate of the installer. It’s accessible for each 32 bit and 64 bit methods, so obtain the one that’s appropriate along with your Home windows machine.
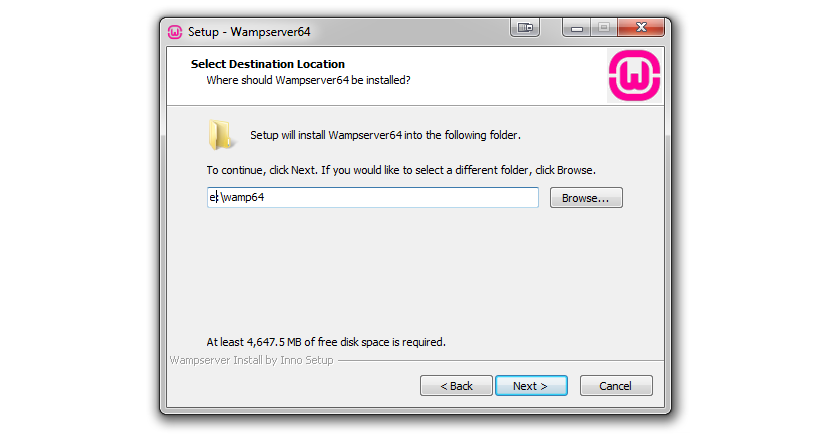
As soon as downloaded, begin the set up. Many of the steps are easy and don’t want any technical clarification. We’ll focus on the steps that want any consideration.
After a few steps, you will have to specify an set up listing. It is suggested that you simply set up WAMP within the root listing of a drive. Take a look on the screenshot beneath.
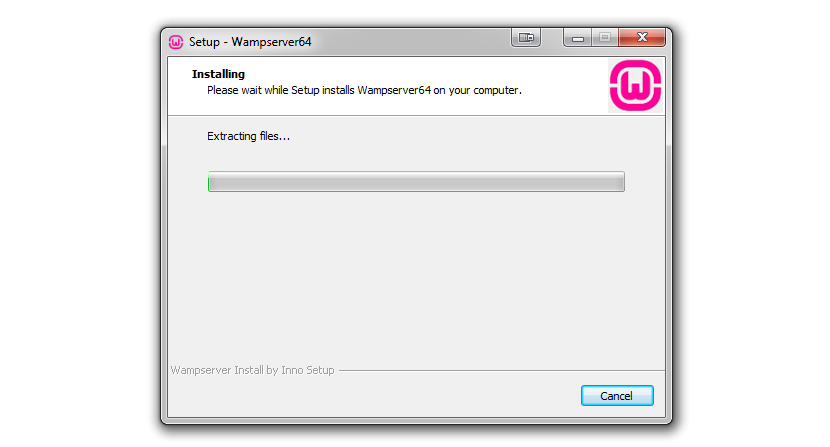
The following few steps are self-explanatory. When you attain the ultimate step, WAMP server will begin putting in in your pc. It often takes a few minutes to put in fully.
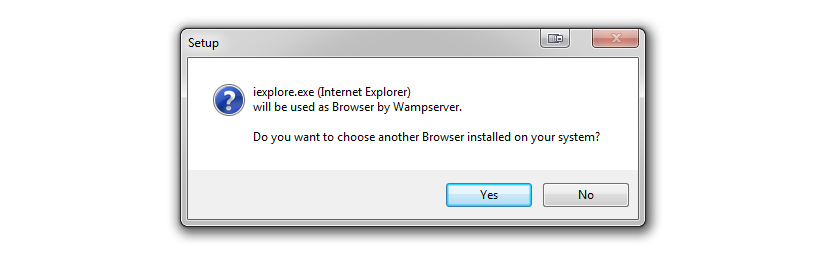
On the finish of the set up, WAMP server will ask in your default browser that you simply need to use to preview your work. Select the one that you simply regularly use.
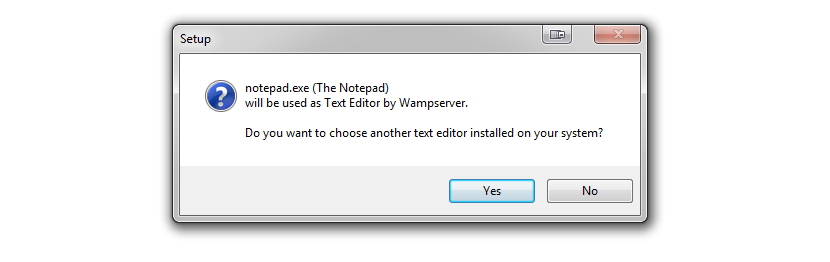
After you select your default browser, the following factor WAMP confirms is if you wish to use your default text editor or change it. A textual content editor is helpful for viewing logs, configurations, and so on. Select the one that you simply like and proceed.
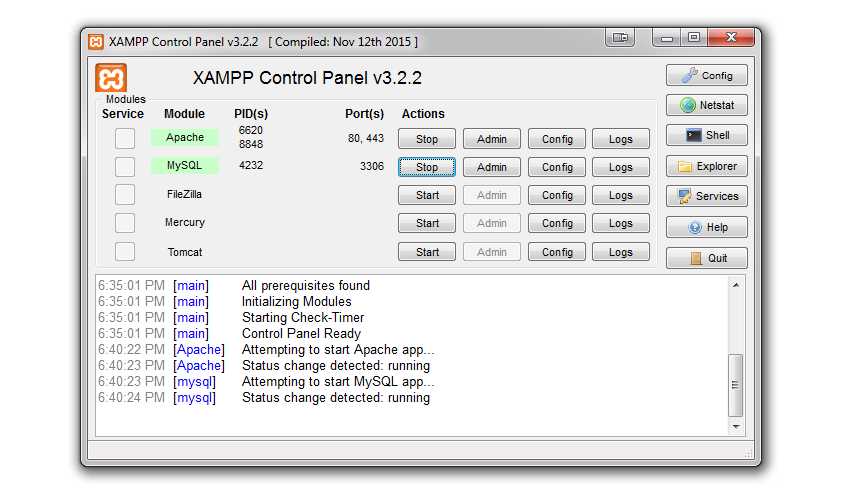
End the set up and run the WAMP server. If all goes properly, you must see the inexperienced icon for WAMP server in your system tray.
![]()
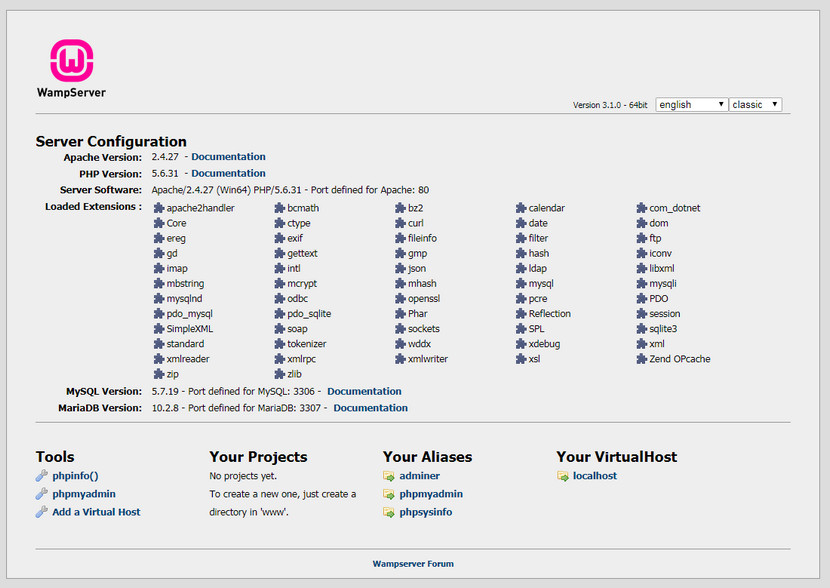
To manually verify, you can even go to your browser and kind “localhost” (with out the quotes) and click on go.
In case you are greeted with the next display screen, congratulations, you may have efficiently put in the WAMP server in your Home windows PC.
4.1 Putting in WordPress On Your WAMP Server
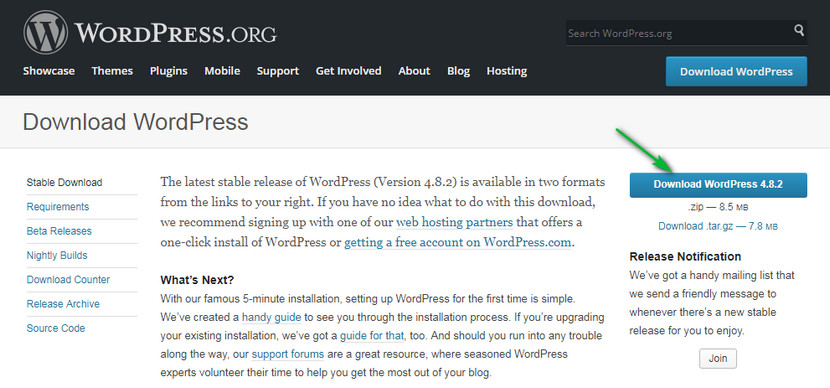
The following step is to put in WordPress in your server. Should you had no bother putting in WAMP, then you’ll have no bother putting in WordPress as properly. Step one is to download WordPress. As of this writing, the present model is 4.8.2.
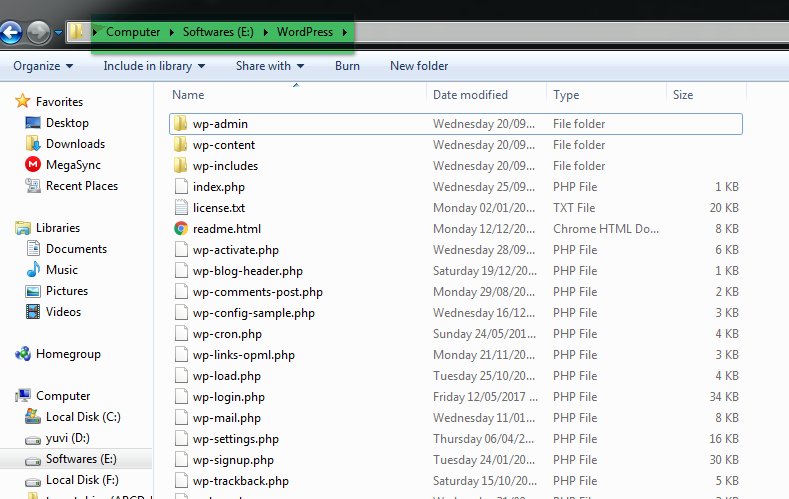
You’ll get a zipper file which is able to comprise the set up recordsdata. Extract the recordsdata and preserve it inside a listing.
Now you may have to choose. You possibly can set up WordPress within the root listing or a separate listing.
- Should you set up WordPress within the root listing, you’ll entry WordPress at- localhost
- Should you set up WordPress in a customized listing, you’ll entry WordPress at- localhost/<customized listing title>
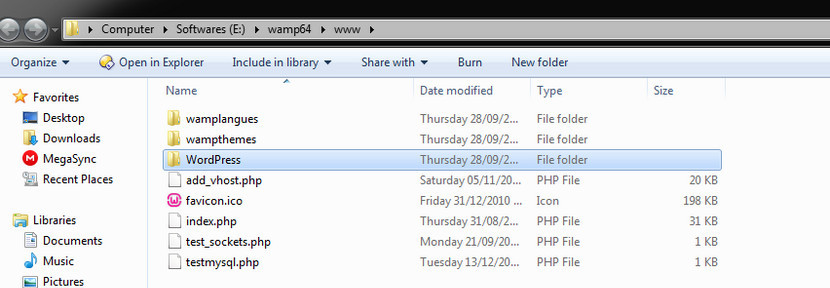
To put in WordPress within the root listing, copy the contents of the WordPress listing to Wamp Set up -> www listing
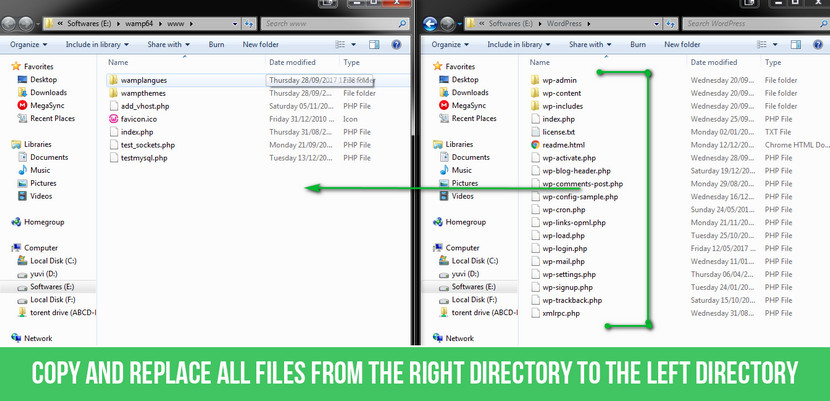
To put in WordPress in a separate listing, create a brand new listing and duplicate all of the WordPress set up recordsdata inside that listing. Within the picture beneath, we’ve copied all of the WordPress setup recordsdata within the listing named WordPress.
For the remainder of the tutorial, we’ll proceed with putting in WordPress inside a separate listing.
The one distinction can be how you’ll entry the setup and WordPress after set up. Remainder of the setup and use of WordPress will stay the identical. You possibly can observe alongside primarily based on which choice you selected.
4.2 Making a Database
Earlier than we setup WordPress, we have to create a database. The database is the place WordPress saves all your pages, posts, and different data.
To create a database, it’s a must to navigate to localhost/phpmyadmin. You’ll attain the login web page.
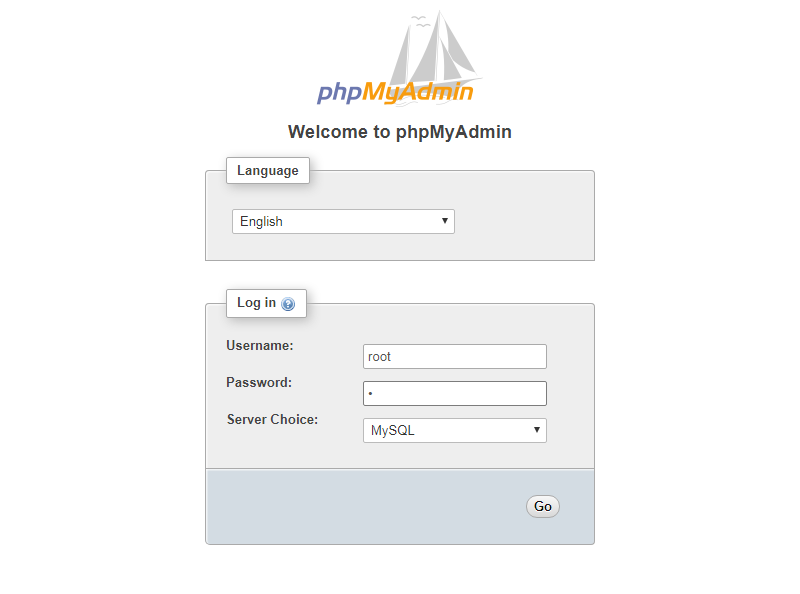
The default credentials are:
- Username: root
- Password: (Go away Clean)
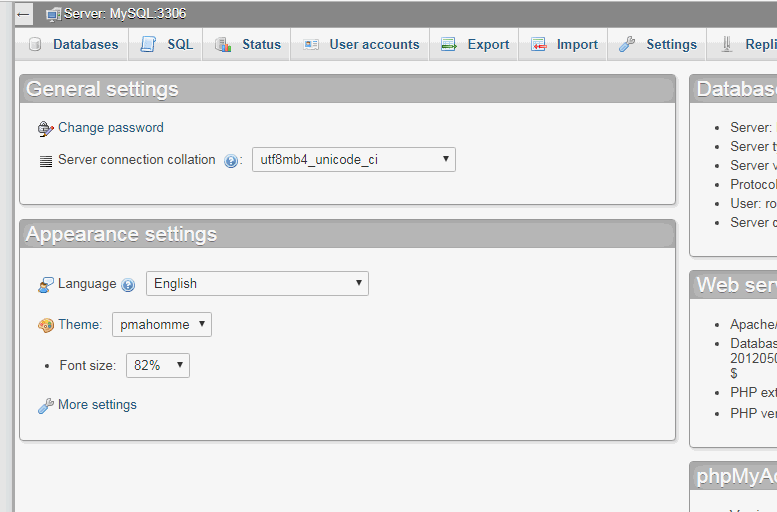
After logging in, navigate to Databases. Within the create database discipline, enter any title for the database and click on create. Take a look at this animation to know the method higher.
Now simply keep in mind the title of the database that you simply simply created.
4.3 Putting in WordPress
We hope you may have already copied the WordPress setup recordsdata within the applicable folder as we talked about within the steps above.
To start out the set up, navigate to the suitable handle. Since we’re putting in WordPress within the “WordPress” listing, we’ll navigate to http://localhost/wordpress.
You’ll be greeted with the WordPress set up web page. Allow us to take you thru the set up step-by-step.
On the primary web page, select the language you need WordPress put in in and click on proceed.
Subsequent, WordPress will remind you to maintain the next data prepared. All it’s a must to do is enter the database title, and the remainder can be default values. Seek advice from the next values.
- Database Identify : mythemeshop (in our case)
- Database username : root
- Database password : (depart clean)
- Database host : localhost
- Desk Prefix : wp_
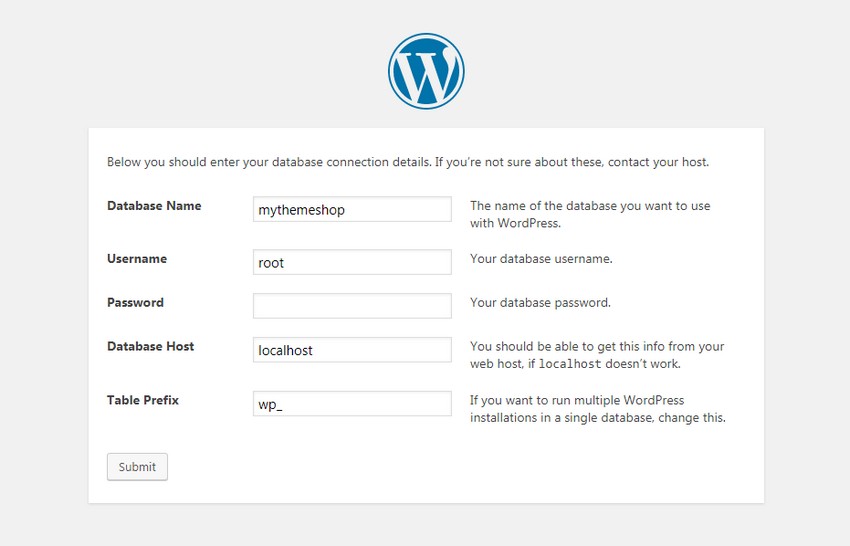
After placing in these values hit submit. It is best to see the next display screen.
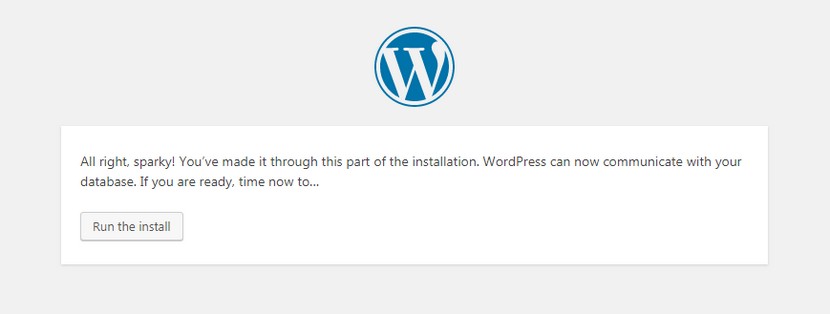
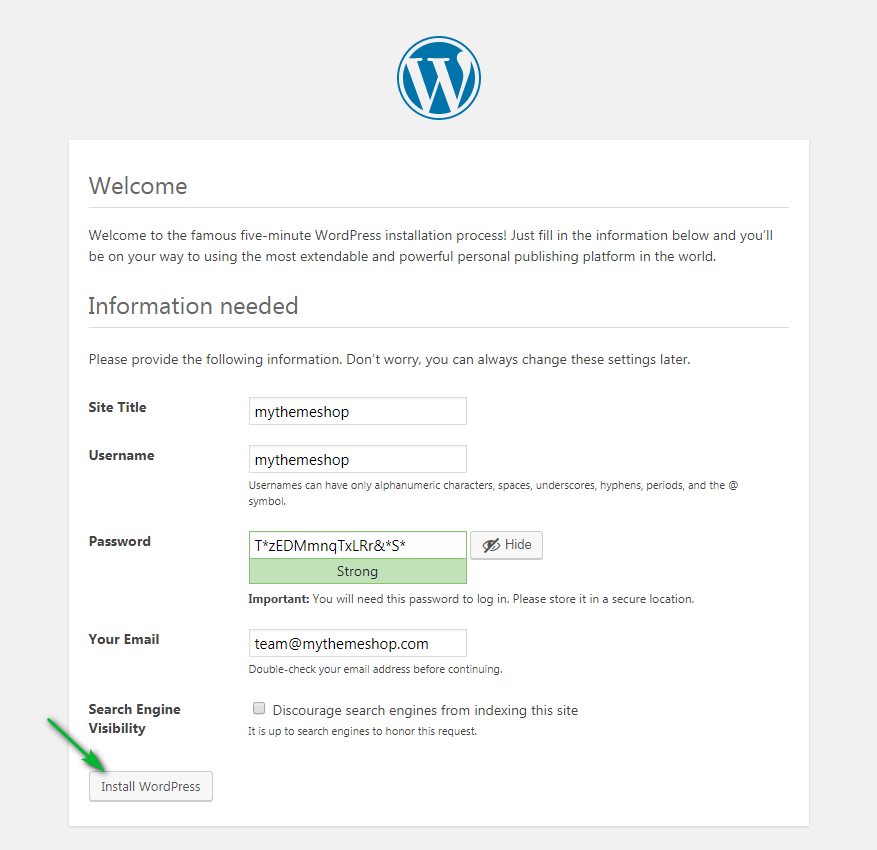
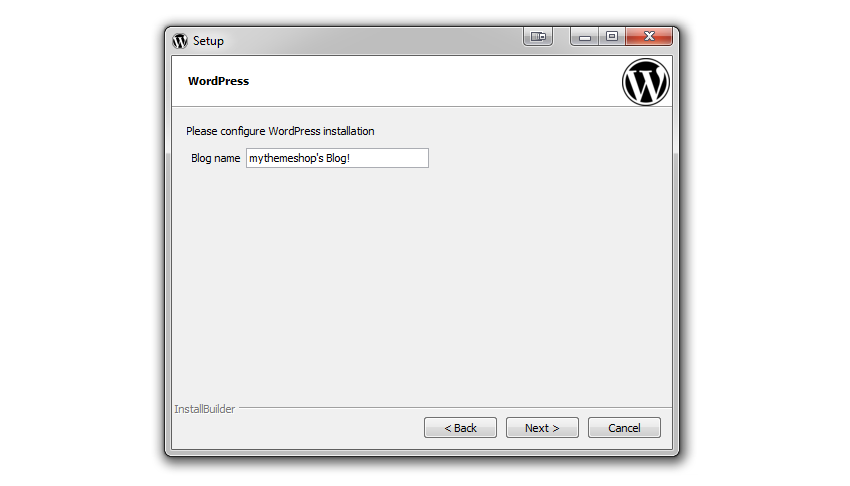
Click on “Run the set up.” You will note the setup web page the place you’ll configure your WordPress set up with some primary data. You’ll have to enter the next data.
- Web site Title : What you want to your web site to be known as
- Username : Enter a username that you’ll use to login to your website. This may also be publicly seen in feedback and authors, so select one.
- Password : You need to use the recommended password or enter a brand new one. Ensure that to memorize it or put it aside in a secure area
- Your electronic mail : Enter a sound electronic mail that you’ve got entry to. This electronic mail can be used for any password restoration makes an attempt sooner or later.
- Search Engine Visibility : Since we’re putting in WordPress regionally, it doesn’t matter whether it is chosen or not.
After filling within the data, click on “Set up WordPress”.
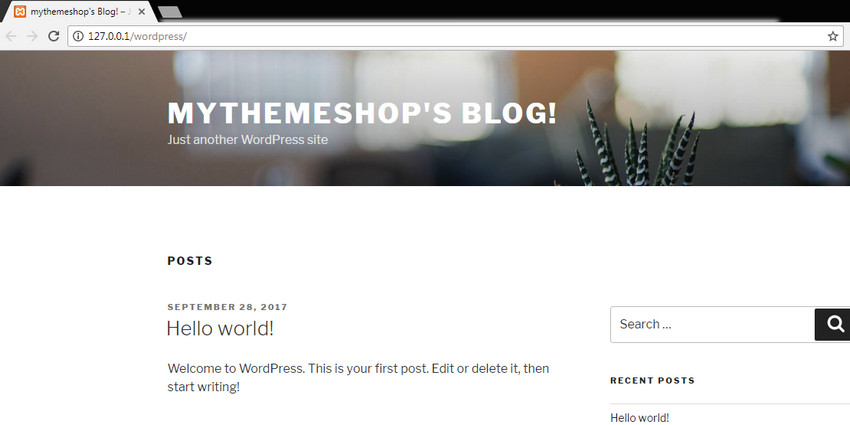
In a jiffy, WordPress needs to be put in. It is best to see the next display screen.
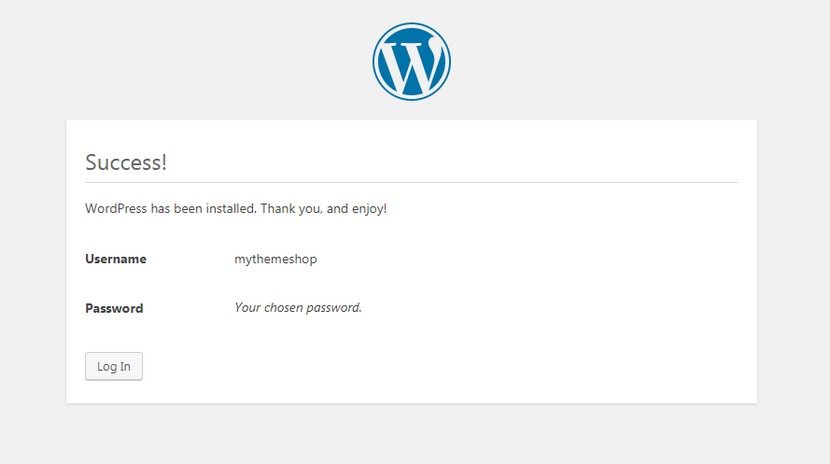
Hit Login and use the username and password mixture to log in. Voila, you simply put in WordPress regionally in your PC with WAMP.
5 Putting in WordPress regionally with XAMPP
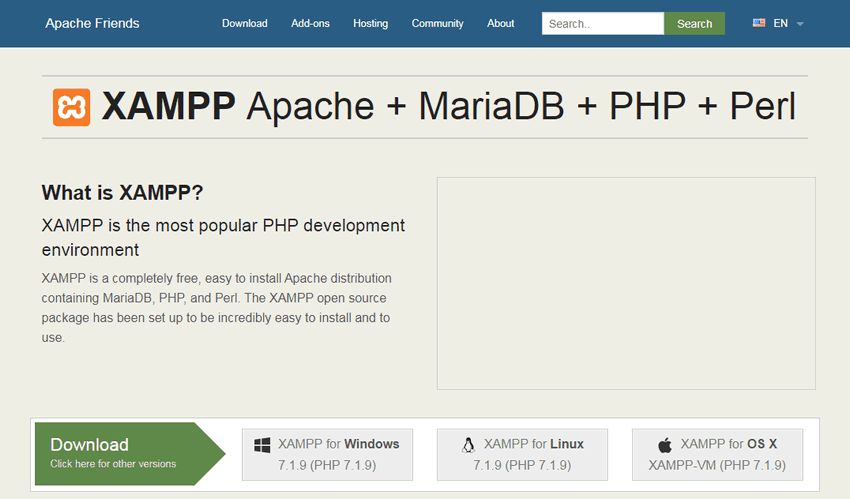
As we talked about, WAMP is offered just for Home windows. To put in WordPress regionally in your MAC, XAMPP is a good different.
XAMPP is offered for MAC, Home windows, and Linux as properly.
To obtain XAMPP, visit their website. Select the platform of your alternative and obtain the installer.
Begin the set up and proceed till you attain the next display screen.
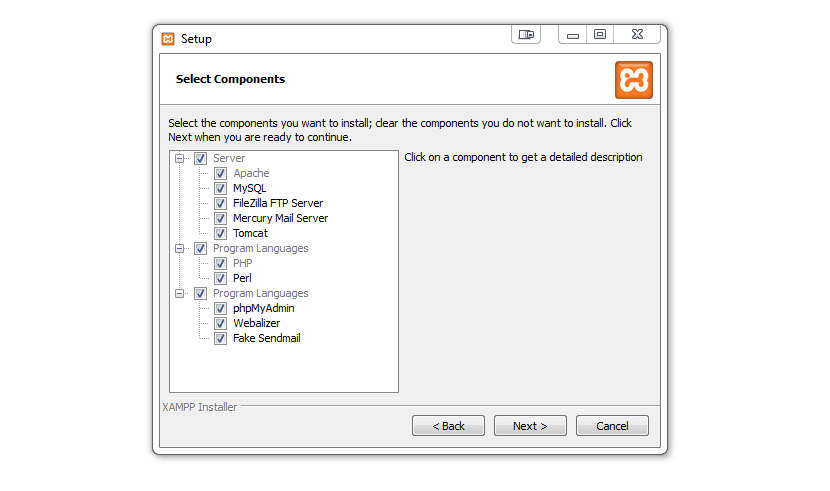
On this web page, you may depart the default settings and click on subsequent. On the following web page, select the listing you want to set up XAMPP and click on subsequent. XAMPP ought to now begin putting in. It takes a couple of minutes to put in fully.
After XAMPP has put in, depart the default choices on and click on end. XAMPP ought to run robotically.
When XAMPP begins, you will note language choice field. Select the language you favor and click on save. You’ll then be greeted with this display screen.
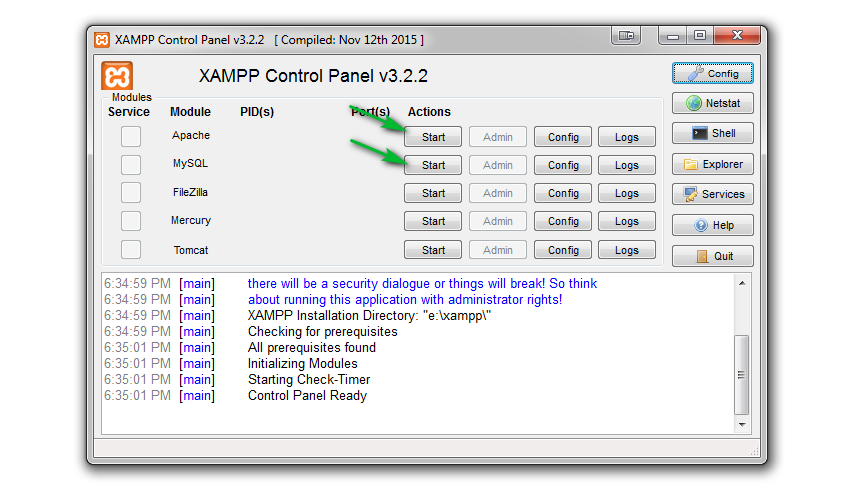
Should you discover, not one of the companies are operating. We might suggest that you simply begin the Apache and MySQL service.
After you have reached this step, then the following step is to put in WordPress. With XAMPP, there are two methods in which you’ll set up WordPress in your MAC or PC.
- Straightforward Approach or the Computerized Setup
- Not So Straightforward means or the guide means
We have now already lined the guide means after we put in WordPress utilizing WAMP.
The method of manually putting in WordPress utilizing XAMPP is the identical. If you wish to set up WordPress manually, scroll up, and observe the directions from the WAMP part. Should you face any bother, tell us within the feedback, and we’ll assist you to out.
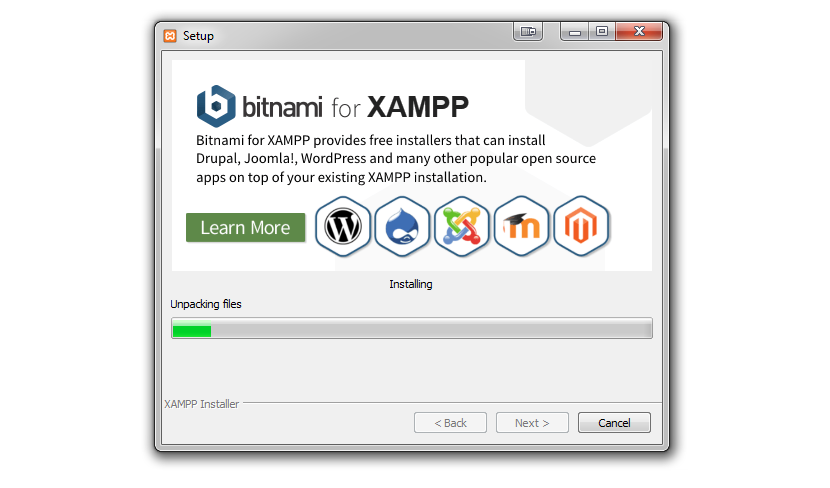
Since we’ve lined the guide set up intimately already, we’ll cowl the straightforward set up intimately. To simply set up WordPress on a XAMPP server, all it’s a must to do is obtain a pre-compiled module and set up it.
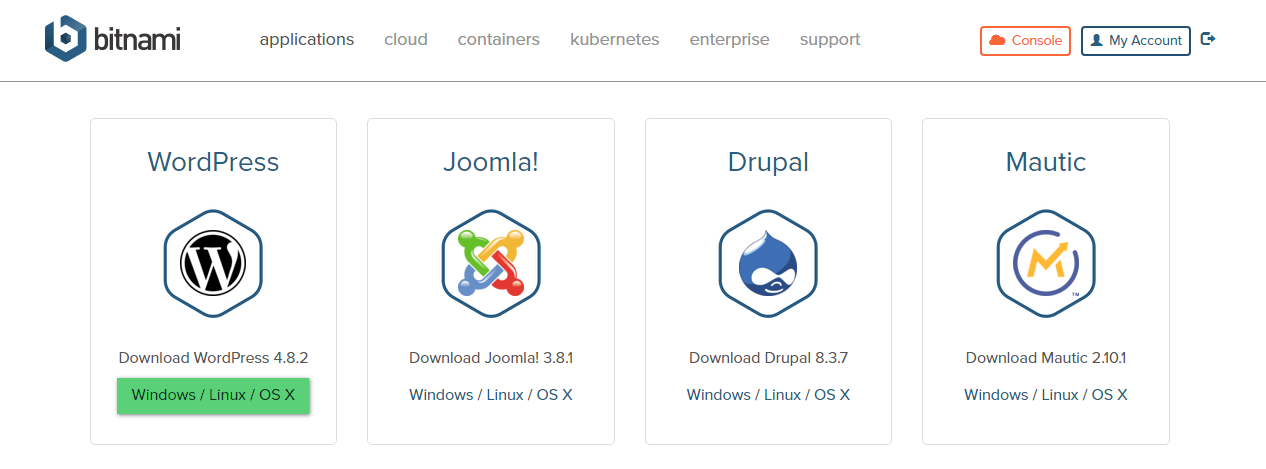
A trusted firm that gives these modules is Bitnami. Go to the XAMPP page on the Bitnami website and obtain the WordPress Module. The module can also be accessible for Home windows, MAC, and Linux.
After the obtain, begin putting in the module. The primary few steps of the setup are self-explanatory. To keep away from any points, make it possible for on the setup display screen the listing path is right. It ought to level to the trail the place you initially put in XAMPP.
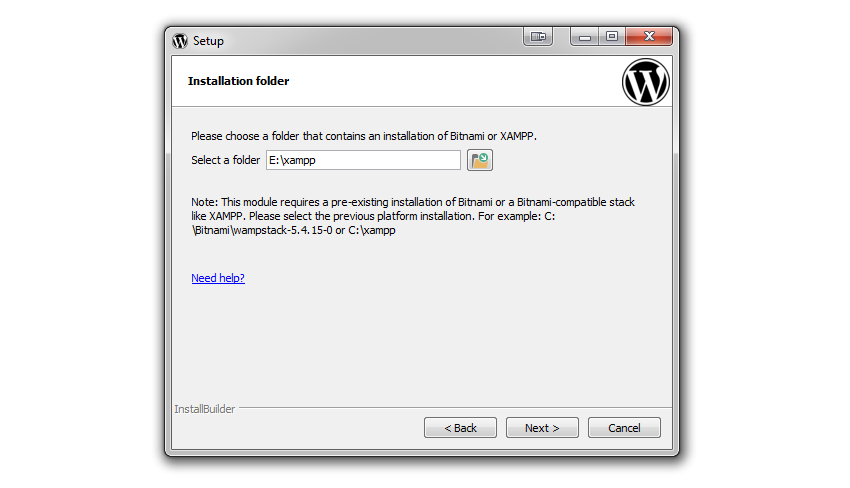
If the trail is right, hit subsequent. It is best to see a setup display screen which is able to ask for some data. Should you observe, these are the precise settings that you simply selected if you put in WordPress utilizing WAMPP.
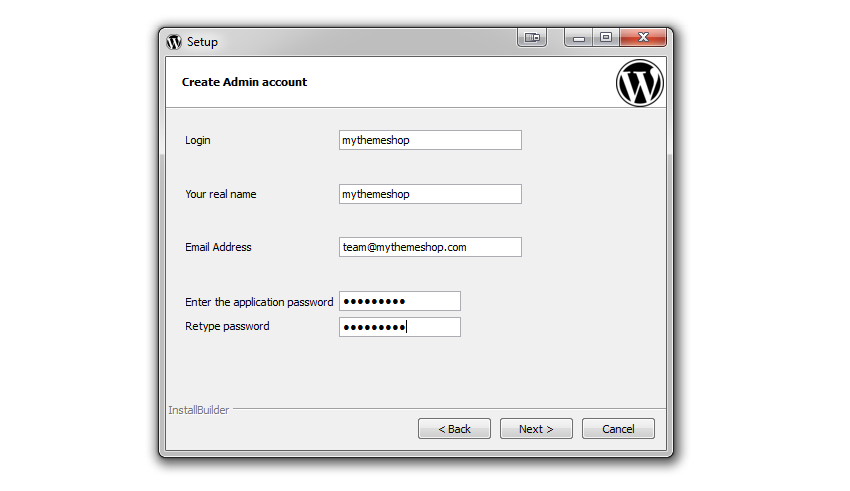
The web page seems totally different as this time the setup is carried out by the bitnami module, not WordPress. Simply to refresh your reminiscence, that is what the settings imply.
- Login : A reputation that you’ll use to login into WordPress
- Your Actual Identify : Your precise title
- E mail Adress : Enter a sound electronic mail handle that you’ve got entry to
- Enter the Utility Password : Kind within the password you need to use to login into WordPress
- Re-type Password : Affirm the password by getting into it once more on this discipline.
While you fill the shape fully, it ought to look one thing just like the picture beneath.
Hit subsequent to proceed with the setup. The following display screen would ask you to decide on your weblog title. Enter the title you want to your weblog to be referred to as and hit subsequent.
The Bitnami module will begin putting in. It takes a couple of minutes to put in. The following two screens are self-explanatory, however for the sake of simplicity, you may un-check the fields in each the pages to simplify the set up.
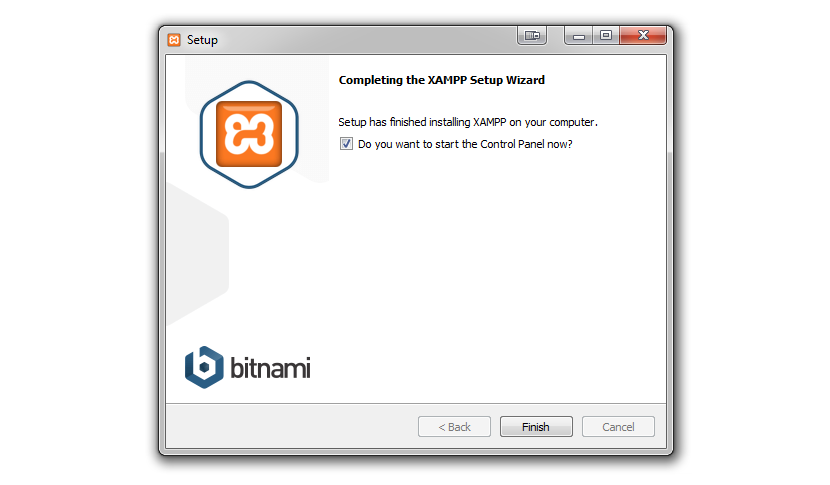
As soon as the setup has completed, hit End and XAMPP will open your weblog’s entrance web page robotically.
Please observe that when utilizing the automated set up by Bitnami, WordPress is put in right into a “WordPress” listing and never the foundation folder.
We hope that the choice to decide on the listing comes sooner or later variations of the installer. That’s it. You will have efficiently put in WordPress in your MAC/PC. To entry the admin space, navigate to http://127.0.0.1/wordpress/wp-admin/ or http://localhost/wordpress/wp-admin and use the credentials that you simply set in the course of the setup course of.
6 Putting in WordPress Regionally with DevKinsta
DevKinsta is a straightforward different method to arrange a neighborhood WordPress website in your Home windows or Mac.
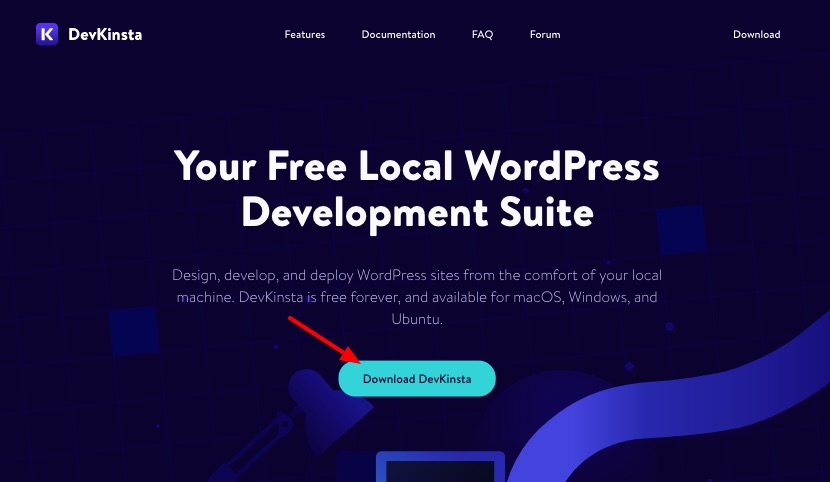
First, head over to the DevKinsta website and obtain the setup file. As soon as the obtain is full, proceed with the set up.
As soon as the DevKinsta set up is full, you’ll be greeted with a Create new Web site display screen, as proven beneath.
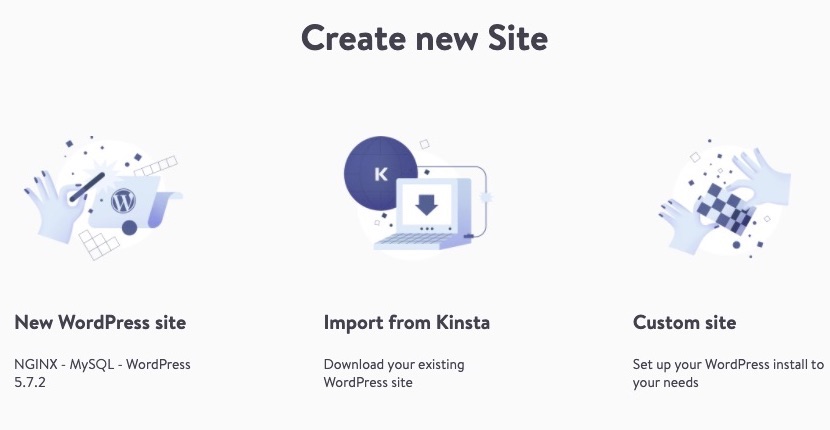
Normally, a neighborhood web site with a predefined configuration can be appropriate. However, If you need a customized configuration, select “Customized website” and arrange the configurations as you want.
In case your web site is hosted at Kinsta, you may arrange a neighborhood copy of your precise stay WordPress web site, by logging in to your Kinsta account. You too can push any native adjustments to your staging surroundings with only a click on which is extraordinarily handy for individuals who depend on Kinsta’s managed WordPress hosting for his or her web sites.
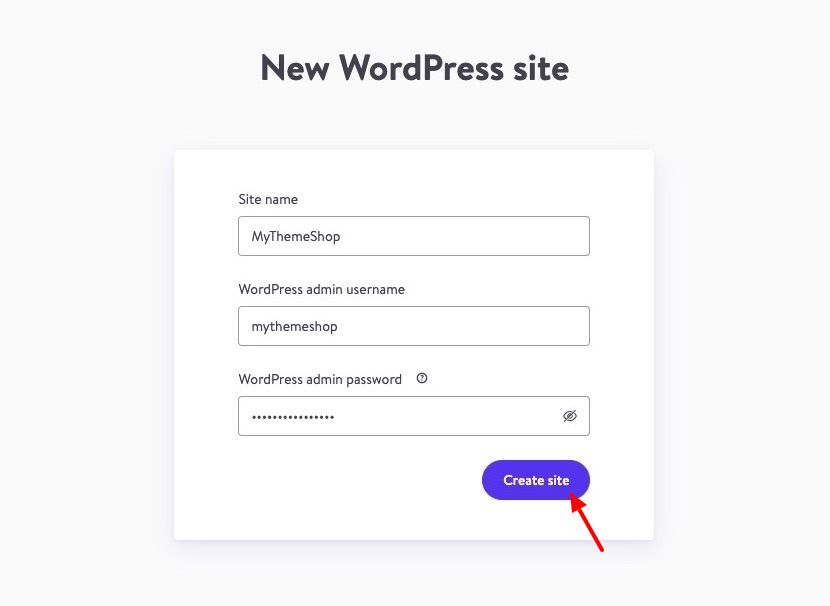
To arrange a neighborhood website with predefined configurations, select “New WordPress Web site”. Within the subsequent display screen, enter all of the required particulars as we did for the earlier installations; solely the consumer interface seems totally different. To your reference:
- Web site title: Kind your native web site’s title
- WordPress admin username: Kind the username in your account
- WordPress admin password: Use the recommended password or kind your personal password, which you’ll want for logging into your account
The finished kind will appear like this, after which click on “Create Web site”.
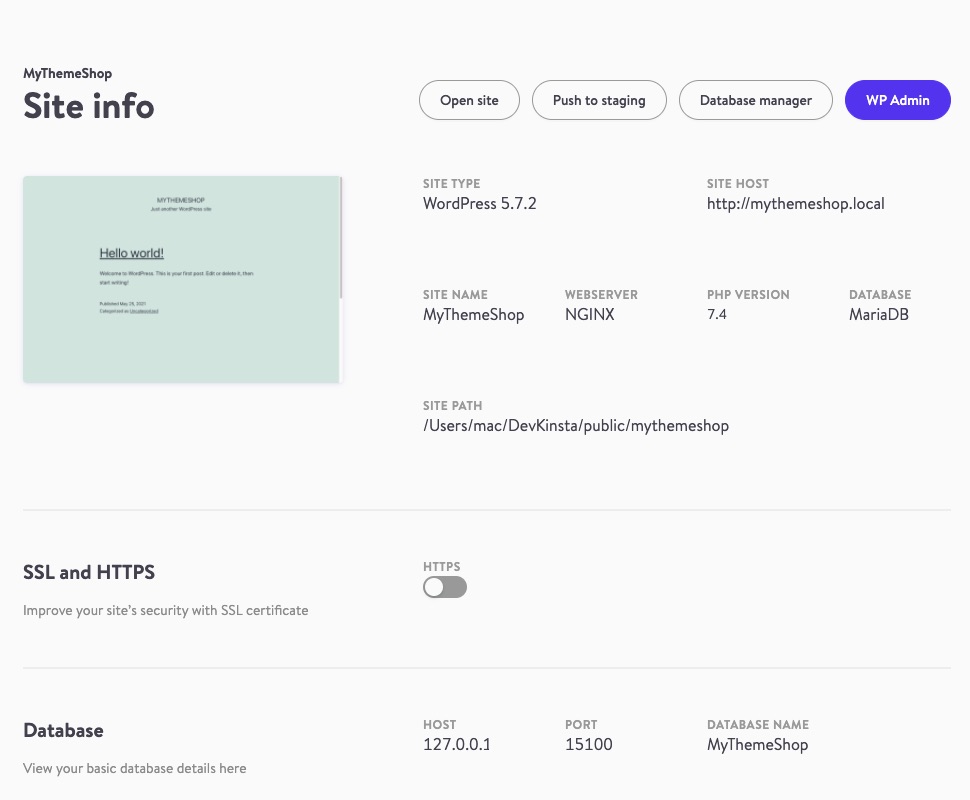
It takes solely a few minutes for the native WordPress website to be put in. As soon as the set up is full, you may go to your website by clicking on the “Open website” button or to the WordPress dashboard by clicking on the “WP Admin” button.
6 Putting in WordPress Regionally By Utilizing Native By Flywheel
Native by Flywheel is likely one of the best methods to setup WordPress in your PC or Mac pc. Not like the opposite strategies, you solely should obtain one setup file which is able to you should use to setup WordPress simply.
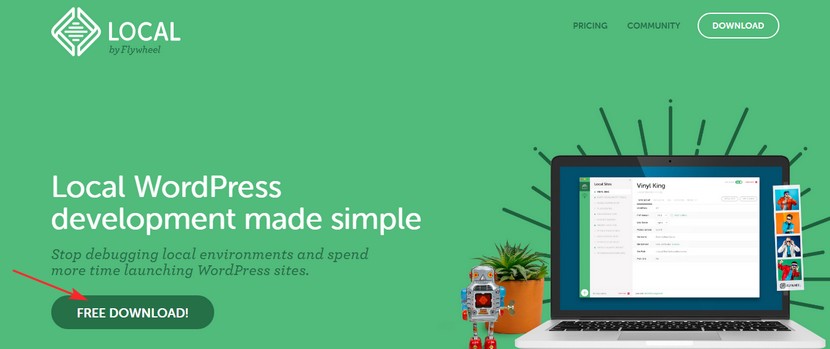
Head to the Local by Flywheel web site and obtain the setup. It’s over 500 MB so preserve that in thoughts.
As soon as the obtain is full, begin the set up, and Native will arrange the mandatory recordsdata.

As soon as the set up is full, you will note the welcome display screen. Hit set up to put in the VirtualBox, Host Machine, and the Native Picture.
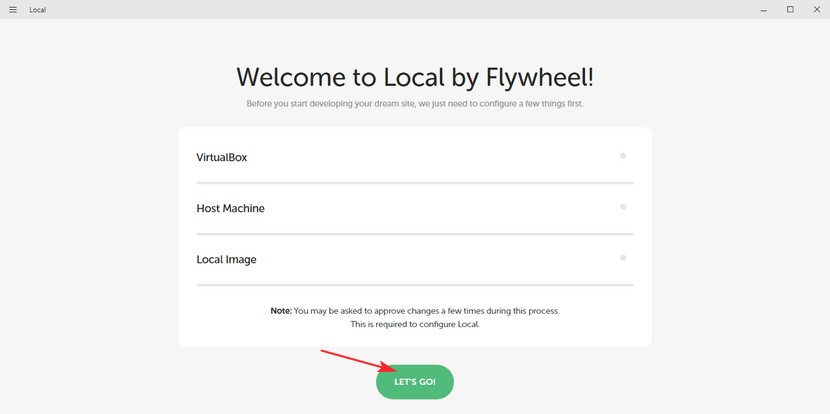
Putting in the three parts takes round three to 5 minutes.
Should you acquired a duplicate from a buddy or a co-worker, the Native would possibly immediate you and replace the native picture. This takes a couple of minutes as properly.
As soon as the replace is full, you will note Native’s default display screen. Click on “Create a brand new website” to start out creating your first website.

On the following web page, you choose your website’s title. Should you click on the superior choices, you will note extra details about how your website can be structured. Allow us to clarify the choices.
- Native website area : Not like the opposite instruments that we used the place you accessed your native WordPress by accessing “Localhost”, Native configures your native WordPress website in a means that it may be accessed by way of a website title. The native website area represents that.
- Native website path : This refers back to the folder underneath which your native web site can be saved.
- Create website from Blueprint? : It can save you blueprints (templates) to create websites with comparable configurations. You may choose a blueprint should you created one.

After you entered your required settings, click on proceed.
Native will ask you to decide on your surroundings. An surroundings refers back to the tech stack with a particular configuration. By default, Native makes use of the Nginx net server with Varnish for caching, PHP 7.1.7 (as of this writing) on the server and MySQL 5.6.
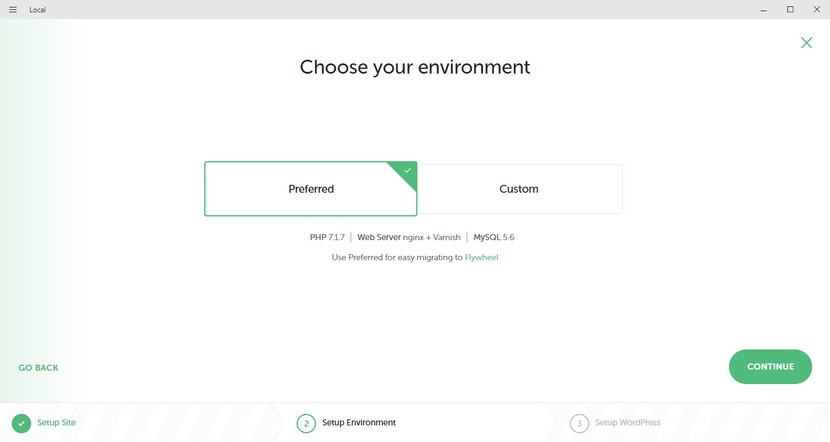
Except you’re a developer otherwise you need to have the precise surroundings as your host, you may depart use the popular surroundings.
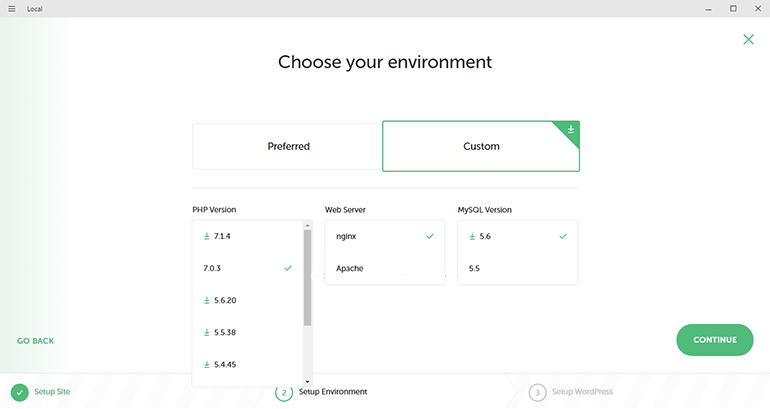
Should you select to customise, you’ll have the next choices. Native will obtain some extra knowledge to create the customized surroundings.
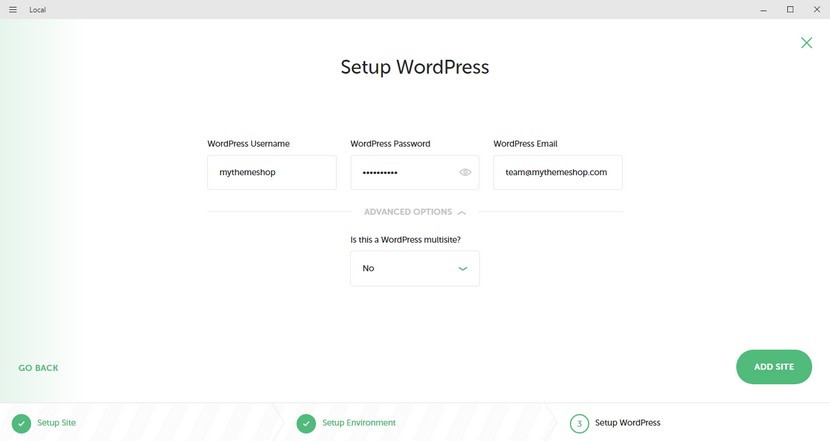
On the following web page, you’ll setup WordPress. You solely have to fill in three fields. Your WordPress username, the password you need to use with that username and the e-mail you need to affiliate with the username.
Within the superior settings of this web page, you may set if you wish to create the WordPress set up as multisite setup as properly.
Click on “Add website” and native will obtain and setup WordPress for you.
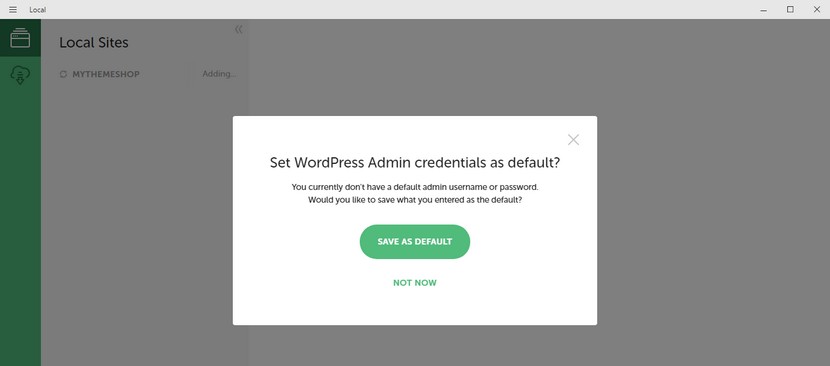
A dialogue field will seem asking if you wish to save your credentials as default. Should you select the save as default choice, all new web site you create with native can have the identical credentials as you created simply now.
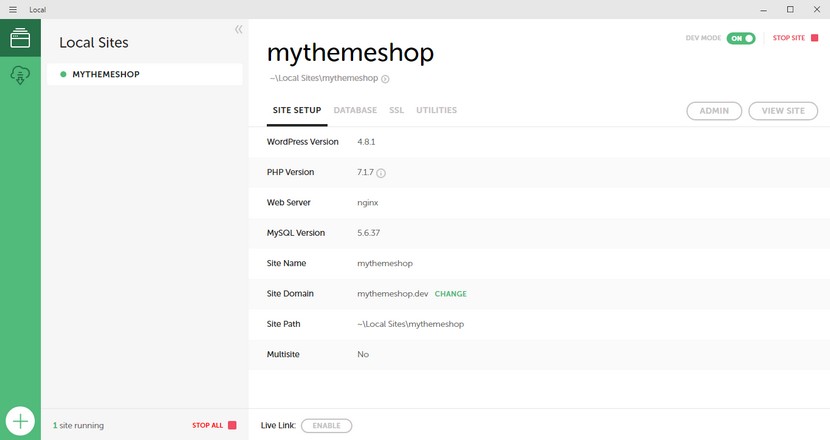
As soon as the setup is full, Native will current you with some details about the surroundings. To launch your web site, click on the “Admin” or “View Web site” buttons to open them in your browser.
7 A Frequent Concern With Native
Should you use native for the primary time, then you definately would possibly run into a standard difficulty. Should you open the admin or the location that you simply simply created, you would possibly see this error.

This downside happens as a result of the default TLD in native is “.dev”. This turned a problem lately because the .dev extension is now used for actual websites.
Native websites can’t use a domain name of an precise web site for apparent causes.
To unravel this downside, change the location area in your Native web site and use a TLD that’s not used for an actual web site.
A typical TLD used for native websites is .native. After making the change, wait a few seconds for Native to replace the settings. You would possibly get a security affirmation. Affirm for Native to make the mandatory adjustments.
That’s all. Native is likely one of the best methods to setup a WordPress website regionally. It’s free, it’s accessible for Home windows and Mac and it’s tremendous straightforward to make use of.
8 Conclusion
We hope that now you’re assured in putting in WordPress in your pc. We all know that there are lots of steps to observe, however you needn’t fear.
Should you make any errors, you may all the time begin over. If you end up prepared to start out an actual WordPress blog, do not forget that MyThemeShop has you lined.
Examine some good internet hosting critiques on our weblog, choose an excellent WordPress theme and present your weblog to the world. We’re right here to assist on each step. As all the time, when you have any questions relating to the above tutorial, hit us within the feedback.